Wednesday, January 25, 2012

apple pie cookies

Oh yes, it is what it sounds like. Cookies is only part of the title because they are so tiny. They are really just teensy apple pies. And they are really good. I saw them on SK and then my boyfriend saw them on reddit, and when we knew we'd be hanging out in front of the TV this weekend watching playoffs, we decided it was time to make them. Luckily, I had all the ingredients on hand. That's right, just by having apples + my standard baking supplies + time, we got to have really delicious baby apple pies. There's still one left, somehow, and it's got my name on it as soon as I finish this post. Even a couple days later, they are still flaky and soft and sweet and spicy. Make them!

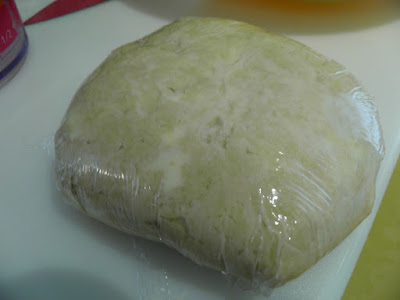
The little white blobs you see in the dough are butter.
This is why you get them to small pea-sized and no smaller, 
because it makes the crust oh so flaky delicious. 
It's the same recipe as the one I used from SK for my Thanksgiving pies

 So we didn't have the right cookie cutters, so I just used an overturned mug or glass
 The set up, using every inch of space in my teensy kitchen. Including the sink.


*I made 1/2 the recipe and that yielded about 14, I believe?


Crust
2 1/2 cups (313 grams) all-purpose flour, plus more for dusting surfaces, dipping fork
2 tablespoons (25 grams) granulated sugar (doubled from my standard pie dough to make this more cookie-like)
1 teaspoon (4 grams) table salt
2 sticks (225 grams, 8 ounces, 16 tablespoons or 1 cup) unsalted butter, very cold
1/2 cup (118 ml) water, very cold (I pour 1 cup and add ice while I work, then measure 1/2 cup from it when I need it)

Filling
3 medium apples, whatever you like to bake with
Squeeze of lemon juice (optional)
1/3 cup (67 grams) granulated sugar
1 teaspoon (2 grams) ground cinnamon
Few gratings fresh nutmeg
A pinch of any other spices you like in your apple pie

To finish
1 large egg
Coarse or granulated sugar for garnish

Additional stuff
A couple baking sheets covered with parchment paper
Rolling pin, pastry brush (for egg wash), fork (for crimping and dipping) and sharp knife (to make slits)
Two round cookie cutters of different sizes. I used 2 1/2-inch and 1 1/2 to 1 3/4-inch rounds. You’ll want to make sure there’s at least a 3/4-inch different in the sizes, as you’ll need the extra margin to crimp your dough.


Make your pie dough: 
Whisk together flour, sugar and salt in the bottom of a large, wide-ish bowl. Using a pastry blender, two forks or your fingertips, work the butter into the flour until the biggest pieces of butter are the size of small peas. (You’ll want to chop your butter into small bits first, unless you’re using a very strong pastry blender in which case you can throw the sticks in whole, as I did.)
Gently stir in the ice water with a rubber spatula, mixing it until a craggy mass forms. Get your hands in the bowl and knead it just two or three times to form a ball. Divide dough in half. Wrap each half in plastic wrap and flatten a bit, like a disc.
Chill in fridge for at least an hour or up to two days.

Meanwhile, get everything else together:
Line up six small dishes. In the first one, pour some water. Leave the second one empty; you’ll use it for your apples in a bit. In the third one, mix the sugar, cinnamon, nutmeg and any other spices you like in your pie, such as a pinch of cloves. In the fourth one, place a little bit of flour to dust your surface and dip your fork for crimping. In the fifth one, whisk an egg with one teaspoon of water until smooth. In the last one, or in whatever container you keep it in, add some coarse or regular sugar for decorating the tops of the pies.

On a well-floured counter, roll out your pie dough pretty thin, a little shy of 1/8-inch thick. Lift and rotate your dough as you roll it, to ensure that it rolls out evenly and so you can be sure it’s not sticking in any place. Use the larger of your two cookie cutters  to cut as many rounds as you can from the dough. Transfer them to parchment-lined baking sheets and keep them in the fridge until you need them. Once you’ve finished the first packet, repeat the process with the second packet of dough.
[I didn't have round cookie cutters so we just cut the apples to fit and used a mug to make circles. It worked.]

Prepare your apples:
Peel your apples. Cut thin (1/8-inch thick) slices from one side of whole apple, stopping when you hit the core. Repeat on opposite side. I got about 10 usable slices from each side of my small-medium-ish apples. Use the smaller of your two cookie cutters (mine was about 1 2/3 inches) to cut the apples into cute little discs that will fit inside your pie cookies. Place them in your second bowl, covering them with a few drops of lemon juice if you find that they’re browning quickly.

Preheat oven to 350 degrees.

And now, assemble away!
Grab your first disc of chilled dough and lightly dampen it on one side with the water. This is to help it seal. Take your first disc of apple and toss it in the cinnamon spice sugar. Place it on the damp side of the bottom disk. Place a second disc of dough on top; I found it easiest to seal it by picking the whole thing up (this is when you’ll be glad that your dough is cold and semi-firm; if it’s soft and getting sticky, chill it until it’s easy to pick up) and press the tops and bottoms around the apple with your fingers. Back on the floured counter, cut decorative slits in your “pies”. Dip your fork in the flour and use it to create a decorative crimp on the sealed edges. Brush your cookie with egg wash and sprinkle with coarse sugar. Replace on baking sheet and chill while you prepare the others.

Bake your apple pie cookies for 25 minutes, or until puffed and bronzed and very pie-like. (If this is your first batch, peer in at them at 20 minutes, to make sure your oven doesn’t run hot.) Transfer to a cooling rack to cool before eating them.

Do ahead:
These will keep for a few days at room temperature, though not in my apartment. You could also make a larger batch of these, doing everything but brushing them with egg and sprinkling them with sugar, and keep them frozen until needed. Bake them directly from the freezer, just adding a couple minutes to the baking time.

Tuesday, January 24, 2012

rosemary mustard pork shoulder

As you may have noticed, I am very lucky to be treated to delicious meals cooked by my boyfriend. I usually help out, but he leads the charge. Last week, we both felt it was time for me to return the favor. Luckily, he was busy with a personal training session one night, giving me time to work in the kitchen without too much stress (it's hard having a better cook watch you cook!). I wanted to make something from my new Joy of Cooking cookbook, and I wanted to make meat as he loves meat and I need to practice cooking with it. I decided a slow cooker meal would be a good way to go because it would allow me to start early and have time, and I wanted to test drive the little slow cooker my parents let me have.

I made half this recipe (3 lbs of meat), and it was still huge. Luckily it was delicious, so we haven't minded having pork tacos for lunch for a couple days. The meat was really tender and delicious, and we have just thrown it in the skillet with some of the sauce and then rolled it up in warm corn tortillas. Yum. I had a few panic moments in getting things to come together (a problem I enjoy not encountering when baking) to have one warm dinner all at the same time (this was also when I made crème brûlée, I was working hard to impress). In terms of timing I would say it took about 45 minutes to get it started, I let it cook 5 hours (it says 5-6), and then about 20 minutes to make the sauce and noodles and let the meat rest. So an hour or so of work plus 5-6 hours in the middle of sitting. Very doable, and not too crazy of ingredients.
 I'm not the best butcher, but I think I got the job done.
I ended up with 3 pieces of meat, and on the right is my pile of connective tissue and fat.


*this is the full recipe - I made half and, as mentioned, it was plenty for 2 people for dinner and a few lunches

1 bone in pork shoulder roast (7.5 lbs) [note: also called pork butt, who knew?]
1 tsp salt
1/2 tsp black pepper
1 tbsp vegetable oil
1 medium onion, chopped
1 medium carrot, chopped
2 garlic cloves, choped
1.5 cups chicken broth
1 cup dry white wine
1.5 tsp dried rosemary
1/2 stick butter
1/4 cup all purpose flour
2-3 tbsp Dijon mustard to taste
salt and black pepper (to taste)
*serve with buttered noodles

Timing:
appx 45 min initially + 5-6 hours slow cooker + 20ish minutes at the end
(make noodles during end time)

Trim the excess fat from the pork shoulder roast and season the meat with the salt and black pepper.
[Note: when working with raw meat, I try to only use one hand to touch the meat and another hand to touch my knife, salt, pepper, etc, so as not to transfer anything. And I washed my hands several times in between steps.]

Head the oil over medium heat in a heavy pot large enough to hold the meat. Add the meat and brown well on all sides, about 10 minutes. Transfer the meat to a 7 quart slow cooker. Pour off all but 1 tbsp of fat from the pot [I didn't need to do this]. Return the pot to medium heat and add the onion, carrot, and garlic.

Cook, stirring occasionally, until the vegetables soften, about 5 minutes. Add chicken broth, wine, and rosemary. Bring to a boil, stirring to release the browned bits from the bottom of the pot. Pour over the meat in the slow cooker. Cover and turn cooker to low setting. Cook without opening the lid until meat is very tender, 5-6 hours.

Transfer the meat to a deep platter and tent with aluminum foil to keep warm [I put it in a dish and covered it with a pot lid that allowed some air to go in and out]. Pour cooking liquid into a large heatproof bowl. Let stand for 5 minutes and then skim the fat from the surface (either with a spoon or by placing a paper towel on top and soaking it up - I didn't have a lot of fat).

Melt butter in medium saucepan over medium-low heat. Whisk in flour and let bubble without browning for 2 minutes. Whisk in the cooking liquid and bring to a boil over high heat. Reduce heat to medium and cook until lightly thickened, about 10 minutes. Whisk in Dijon mustard and adjust seasoning with salt and pepper.

Slice the meat, which should fall off the bone [I didn't have any bone in my 3 lb roast], and discard the skin [I didn't really have any skin either]. Pour half the sauce over the meat and transfer the remaining sauce to a bowl or sauceboat, and serve with buttered noodles. 

Monday, January 23, 2012

creme brulee

I made crème brûlée last night! It was a very exciting accomplishment. Was it perfect? No, I don't think I had the custard just right because I let it cook longer than it was supposed to because the recipe I read (Ina Garten) said it should be set when gently shaken. Nervous because mine wasn't, I left it in longer until I watched an Alton Brown video that said to take them out at 35-40 minutes regardless and it will set later. So now I know to tell you and for next time. His little 3 minute video was super informative and helpful to get to see it instead of just reading it. I consulted Ina Garten's recipe and Alton Brown's recipe but sort of improvised and didn't follow either exactly. It worked out pretty well, I think.

I think this is the crème brûlée set that I have (I don't have the box with me, but it was 4 oval ramekins and a black torch). My dad gave me some extra cans of gas and showed me how to fill it up. I felt pretty snazzy using a torch, I'm not going to lie.

Really, watch Alton Brown's video because he shows you how it should look coming out of the oven and how to brûlée it properly, so it is really helpful. I think it is 3 minutes long, so it is well worth your time.

And now for my pictures. This was fun, and my boyfriend was really excited about getting to use the torch. So was I, for that matter.


1 extra-large egg
4 extra-large egg yolks
1/2 cup sugar, plus 1 tablespoon for each serving
1 pint heavy cream
1 teaspoon pure vanilla extract

Preheat the oven to 300 degrees F.

In the bowl of an electric mixer fitted with the paddle attachment, mix the egg, egg yolks, and 1/2 cup of the sugar together on low speed until just combined. Meanwhile, scald the cream in a small saucepan until it's very hot to the touch but not boiled. With the mixer on low speed, slowly add the cream to the eggs. Add the vanilla and orange liqueur and pour into 6 to 8-ounce ramekins until almost full.

Place the ramekins in a baking pan and carefully pour boiling water into the pan to come halfway up the sides of the ramekins. Bake for 35 to 40 minutes, until the custards are set when gently shaken. Remove the custards from the water bath, cool to room temperature, and refrigerate until firm.

To serve, spread 1 tablespoon of sugar evenly on the top of each ramekin and heat with a kitchen blowtorch until the sugar carmelizes evenly. Allow to sit at room temperature for a minute until the caramelized sugar hardens.

Thursday, January 19, 2012

new apron

My "aunt" Jan gave me a cute new apron and two coffee mugs from Anthropologie, so I thought I would show you my pretty little red apron in action today baking cookies. Thanks Jan! Actually, my cute little oven mitts are also from Jan from Anthropologie. They've been in battle a bit and have some stains to show for it, but otherwise are faring well. I especially love watching my boyfriend use them.


spinach pesto pasta

I'm due to go to the grocery store (and will tomorrow as I have big plans to make dinner for the boyfriend, my first solo attempt to impress him with my culinary, non-baking skills), so my dinner plans tonight were vague. I have some random leftover items from the juicing and a couple staples in the pantry, but nothing obvious. Thinking about the amount of spinach I had made me think about making a pesto. I've made a tomato-almond pesto before and read about pea pesto, so I knew there were variations to be made on it. I looked up a basic pesto recipe in Joy of Cooking, and this was my substitution thought process:
  • basil - spinach (fresh for both)
  • pine nuts - pistachios
  • garlic
  • olive oil
  • parmesan
I closed the cookbook (gasp!) and just sort of winged it. It was really good. The garlic gave it a bit of a bite, but I like that. If I had been thinking right, I would have started the pasta first, and it would have been a really quick dish to make.


*I think I only used 1/2 to 1/3 of the full yield for my 1 serving of pasta, the rest is in the fridge for tomorrow.

2 cloves garlic
8-10 shelled pistachios
1 cup fresh spinach
1/2 tbsp olive oil
1 cup grated parmesan
salt to taste

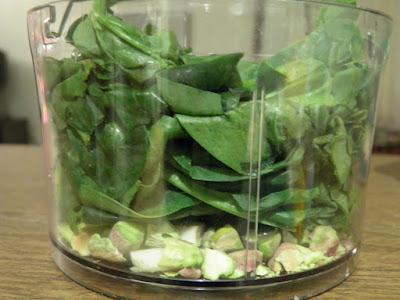
I used my cuisinart speed stick food processor attachment to blend up 2 cloves of garlic, about 8-10 pistachios (shelled, of course), and about a cup of fresh spinach. 

I blended and stirred it until it was all the texture I wanted. I added a bit of olive oil (all told, maybe half a tablespoon), grated in some parmesan cheese (probably a half to three quarters of a cup), seasoned it with a bit of salt, and blended it a bit more. 

Then I cooked the pasta, spoon drained it into a bowl, mixed it with about half of the pesto, and then served it with a bit more parmesan on top.

oatmeal chocolate chip cookies

I know that I just posted a recipe for oatmeal chocolate chip cookies, so this is fairly repetitive. I have been trying to use my new Joy of Cooking cookbook whenever possible, though, and my sister specifically requested oatmeal chocolate chip cookies. How can I say no to a simple request like that?

Blonde moment: forgot the oats. Seriously. I made it, noticed the consistency was a bit drippy while putting them on the cookie sheet, and put them in the oven. I turned around, tidied up a bit, and then noticed the very large and obvious cylinder of oats. Oh, ohhh, yeah. Oatmeal chocolate chip cookies. Well the first 6 weren't (and unsurprisingly were quite thin) and then the rest were. I hastily gave my sister the first 6 still hot (she was off to pick up kids to babysit), so I didn't get to try how they turned out (too crispy? too thin? off flavor?). The dough sure as heck was delicious and I liked the cookies too. The cookbook says not to put in the cinnamon and nutmeg if not making oatmeal raisin, but I like those flavors so I kept them to make the chocolate chip version more interesting.
Still don't notice something is missing...
 Growing suspicious about cookie dough texture...
 After realizing that they were missing the OATS!
 That's more what we had bargained for...

I made a half recipe, which gave me about 24 cookies. Below is the original recipe from Joy of Cooking 75th edition

1 3/4 cups all purpose flour
3/4 tsp baking soda
3/4 tsp baking powder
1/2 tsp salt
1/2 tsp cinnamon
1/2 tsp nutmeg
1 cup (2 sticks) unsalted butter, softened
1/4 cup sugar
1 1/2 cups packed brown sugar
2 large eggs
2 1/2 tsp vanilla
1 cup chocolate chips
3 1/2 cups old fashioned rolled oats

Preheat oven to 350 F.

Whisk together flour, baking soda, baking powder, salt, cinnamon, and nutmeg.

Beat butter, sugar, brown sugar, eggs, and vanilla until well blended.

Stir in dry mixture. Stir in raisins and oats. Shape into balls and place on cookie sheet (greased or parchment lined, I prefer parchment). Flatten into rounds. Bake until lightly browned, 12-14 minutes.

margarita pizza, with stone

I gave my boyfriend a pizza making kit for Christmas, and we finally got around to using it (finally only because we cook so often). I wanted to make homemade dough for it (memories of making pizza weekly with Eryn in Morocco and the giggles that accompanied all of our kitchen time), so I've included the basic recipe from SK, though I tweaked it a bit. I think using the whole wheat flour instead of some of the regular flour contributed to the thickness of the dough, as did some perhaps imperfect measurements on my part. When it was hot, it was good, but the crust part was a bit more chewy than normal. I haven't had this problem using the same recipe but all white flour, so if you follow it exactly, you shouldn't have a problem.

We first baked the dough on the stone with a bit of olive oil, garlic, herbes de Provence, fresh thyme, and black pepper. Once it was about halfway done, we brought it out and put on the tomato sauce (from a jar), mozzarella and parmesan cheeses, and tomatoes, and put it back in the oven. When it was finished, we sprinkled fresh basil on the top, and voila. It was very yummy. We even enjoyed it cold the next day (sometimes reheating in an oven [no microwave], though worth it when I do, is more than I'm bothered to try).


*I doubled this recipe for our pizza, but I have used this for two and its been good (and thinner)


6 tablespoons warm water (may need up to 1 or 2 tablespoons more water)
2 tablespoons white wine
3/4 teaspoon active dry yeast
1/2 teaspoon honey
1 teaspoon salt
1 tablespoon olive oil
1 1/2 cups flour [I used 1/2 cup whole wheat flour with 1 cup regular flour]


Whisk wine, water and yeast in a medium bowl until yeast has dissolved. Add honey, salt and olive oil and stir. Add flour and no matter how dry it looks, work it with a spoon and your fingers until it comes together as a dough. Add more water one tablespoon at a time if you need, but in my experience, this is almost never necessary.

Sprinkle some flour on the counter and knead the dough for a minute or two.

If you’re like me and always trying to reduce the number of dirty dishes left at the end of the night, wash the bowl you made the dough in, dry it and coat the inside with olive oil. Put the dough in, cover it with plastic wrap, and let it rise for an hour or up to two, until it is doubled.

[Easiest way to tell if a dough has risen enough? Dip two fingers in flour, press them into the dough, and if the impression stays, it's good to go. If it pops back, let it go until it doesn't.]

Wednesday, January 18, 2012

juicing

After a few conversations about it with my boyfriend and a viewing of Fat, Sick, and Nearly Dead (on Netflix instant watch, check it out), we decided to try out a juice diet/fast. Our original plan was 3 days, but we went 46 hours before deciding we wanted dinner. On the one hand, it was challenging, but on the other hand, I felt pretty good and most of my hunger wasn't real hunger. More on that later. I'd definitely do it again.

In the documentary, he goes on a 60 day juice diet and encourages several people to try it out with a 10 day juice cleanse. We decided on 3 days because we weren't as unhealthy as most of the people in the film who were trying it out, and I wanted to make sure that I picked a really feasible amount of time so that my willpower would last. Not to throw him under the bus, but while I was definitely hungry and ready for food, my boyfriend was the one who was really ready to eat. I felt hunger, but once I had a glass of juice, I was pretty full and could last a few hours before the next dose. I think some of the impact on our slightly different responses can be a result of
  • gender (he needs more calories and we were drinking about the same amount)
  • activity level (we both workout, but since I don't have a job, I'm not as out and about as much)
  • muscle mass (going back to calorie needs)
  • mental need for food
Don't get me wrong, I love food. I think about it, I almost exclusively watch the Food Network, the highlight of my day is usually cooking or going out to eat for dinner, and I spend a good amount of time with recipes thinking about what to make next. Like many people, a lot of my best moments have involved food and friends together. That said, it wasn't so hard for me not to eat it because I knew that 3 days would end relatively quickly and then it would be back in my life. It wasn't a radical lifestyle change, just an experiment. I would like to stress that I am a pretty healthy person in general, so it could inspire a significant life change and shift in eating habits for a lot of people who really need it. 

3 days of fruit and vegetable leftovers from my juicer


In the movie, everyone who tried it talked about how much better they felt, they quickly lost some junk pounds, their skin really improved (part of what inspired me to try it), and their systems got nicely cleaned out within a couple days (yes, I'm talking about poop - and not just any poop, but getting rid of things that have been clinging to your insides for a while). They say that the first few days are pretty brutal physically and emotionally. I can't really speak to that because I mostly felt fine, and other than obviously being aware that I was only ingesting juice and water, nothing really felt or seemed or behaved differently in my body. 

Was it worth it? Definitely. I liked getting to try something new and challenge myself a bit. I definitely felt healthy knowing that I was only putting good things in my body. I did feel awake and energized throughout the day, and I think hoping that it would make me and my skin better had a good positive thinking impact on how it went. 

Some important things to remember if you try it out:
  • This isn't fasting - you can drink as much water as you want, and, as far as I understood it, as much juice as you want
  • Store bought juice is NOT equal to the juice you should make for this. We bought a gallon of juice from a local juice bar (sort of a brutal flavor) that was made fresh for me and then used a juicer to make the rest of it. If you do this, drinking glass after glass of OJ and apple juice is not the correct thing.
  • When we think of juice, we think fruits. This should be heavily vegetable based. Fruits are important for balancing the flavors and masking some of the vegetable taste (apples, citrus, and ginger are great for this), but they aren't the bulk of it. 
  • Read up on it. We based ours mostly off the movie, some recipes for the Mean Green juice used in the film, and some basic internet searches. 
My fridge with our first batch of groceries for the juice fast:
oranges, green apples, lemons, strawberries, cucumber,
blueberries, blackberries, carrots, spinach, kale, ginger
 the juice we bought: the love cleanse
cucumber, celery, parsley, coconut water, spinach, kale
*it tasted very intensely like these veggies; we always mixed it with 
apple, citrus, and other items to help with the flavor so we could drink it


An example of one of our homemade juice meals (for two):
  • 1/2 bunch kale
  • 1/2 bunch spinach
  • 2 oranges
  • 2 green apples
  • 1 lemon
  • 1 banana
  • 1-2 carrots
  • handful blueberries/other berries

Thursday, January 12, 2012

dad's strawberry shortcake

Ah, a childhood favorite. My dad made this a lot while I was in middle and high school, and it is one of my all time comfort foods. When I was in Morocco, I went on a trip to London and saw a box of bisquick in the store. I bought it and brought it to Casablanca with me, and Eryn and I loved making strawberry shortcake as a special treat. It is super simple and yummy and just makes me so darn happy. I always serve it with milk and sugar sprinkled on top, but to each his own.

*recipe from the box of bisquick


3 tablespoons white sugar
2 1/3 cups Bisquick baking mix
1/2 cup whole milk [or whatever kind you like]
3 tablespoons butter

Preheat oven to 425 F. Combine dry ingredients. Mix in milk and melted butter. Shape into individual shortcakes. The flatter, the more cooked through they will be once they are golden brown. Cook 10-12 minutes.

snickerdoodles, redux

This was my first recipe that I made from my new Joy of Cooking cookbook. Unfortunately, I wasn't being a very good reader (or thinker) and instead of rolling the cookies in the cinnamon sugar mixture, I just added it in. Basically, I made cinnamon sugar cookies. But they tasted good, so who's upset? I was really surprised by how much they spread out, so my first batch made pretty giant, thin cookies. The second batch was smaller but still really thin, and I cooked them a bit too long. So keep an eye on them.


*this is the full recipe, I made a half version and got about 18 cookies

2 cups all purpose flour
2 tsp cream of tartar
1 tsp baking soda
1/4 tsp salt
1 cup (2 sticks) unsalted butter, softened
1 1/2 cups sugar
2 large eggs

1/4 cup sugar
4 tsp ground cinnamon

Heat oven to 350 degrees F. Grease or line 2 cookie sheets.

Whisk until well blended the flour, cream of tartar, baking soda, and salt.

In a large bowl, beat the butter and sugar until creamed. Add the eggs and beat until well combined. Stir in the flour mixture.

Combine the sugar and ground cinnamon. Shape the dough into balls and roll in the cinnamon sugar mixture. Bake until cookies are light golden brown, about 12 minutes.

Nutritional information (for 1/36 of full recipe)
112 total calories
5g total fat
15g total carbs
1g protein

chocolate chip spice scones

I've made variations on these scones a few times, but this was the most improvising I've done. They really should be called everything but the kitchen sink scones because I did not have all the ingredients on hand by a long shot. I'll post the original recipe and my interpretation this time... They turned out all right, though. I did some with chocolate chips and some without, and I definitely thought the chips added something good and necessary to it.


Courtney’s Cardamom Ginger Scones

3 cups flour
2 tsp baking powder
½ tsp baking soda
½ tsp salt
¾ tsp ground cardamom
1 egg
1 cup yogurt/crème fraiche
¼ cup chopped candied ginger
½ cup sugar

*my version

3 cups flour
2 tsp baking powder
½ tsp baking soda
½ tsp salt
¾ tsp apple pie spice mix (ground cinnamon, cloves, etc)
1 egg
1/2 cup yogurt/crème fraiche
1/2 cup applesauce [I may have used more to get it to a workable consistency]
½ cup sugar
3/4 cup chocolate chips


preheat oven to 375
mix dry ingredients first
then add stick of butter (cubed into small pieces) [if you want to add butter, I don't usually]
add egg, yogurt, sugar, spices, and chocolate chips
mix together until thick dough mixture
bake in oven for around 25 minutes

mushroom risotto + roasted brussels sprouts

First of all, I always thought it was just "brussel" sprouts and not "brussels" sprouts. Not that it really matters because you get the s sound in there either way, but now I'm going to pay special attention to the way I say it. Anyway, I've never eaten brussels sprouts before, but I saw them pop up a couple times on food network and smitten kitchen, so when we saw them at the grocery store we bought a bag. And then they sat in my fridge for about a week, lonely and uneaten. Finally, just before they would probably go bad, we decided to make them and see how they turned out. I think roasting was good, and the more they were roasted, the better we liked them. Our conclusion was that our batch was a few minutes shy of what we would have liked but that overall, brussels sprouts are getting a bad rap and aren't so bad. Along with the brussels sprouts, we made risotto because, well, we love risotto and it's always delicious. Both the brussels sprouts and risotto recipes were from allrecipes.


Roasted Brussels Sprouts

*we didn't measure and just put in the amount that we thought fit however many sprouts we had

1 1/2 pounds Brussels sprouts, ends trimmed and yellow leaves removed
3 tablespoons olive oil
1 teaspoon kosher salt
1/2 teaspoon freshly ground black pepper
garlic, chopped [we added this]
parmesan, grated [we added this at the end after the oven]

Preheat oven to 400 degrees F (205 degrees C).

Place trimmed brussels sprouts, olive oil, kosher salt, pepper, and garlic in a large resealable plastic bag [or mix by hand in a bowl, like I did]. Seal tightly, and shake to coat. Pour onto a baking sheet, and place on center oven rack.

Roast in the preheated oven for 30 to 45 minutes, shaking pan every 5 to 7 minutes for even browning. Reduce heat when necessary to prevent burning. Brussels sprouts should be darkest brown, almost black, when done. Adjust seasoning with kosher salt, if necessary. Serve immediately [with parmesan cheese grated on top].

Mushroom Risotto

6 cups chicken broth, divided [we probably used 4-5 cups]
3 tablespoons olive oil, divided
1 pound portobello mushrooms, thinly sliced [we didn't use this]
1 pound white mushrooms, thinly sliced [we used 8 oz regular mushrooms]
2 shallots, diced
1 1/2 cups Arborio rice
1/2 cup dry white wine
sea salt to taste
freshly ground black pepper to taste
3 tablespoons finely chopped chives [didn't use]
4 tablespoons butter
1/3 cup freshly grated Parmesan cheese

In a saucepan, warm the broth over low heat [or boil water and add bouillon cube].

Warm 2 tablespoons olive oil in a large saucepan over medium-high heat. Stir in the mushrooms, and cook until soft, about 3 minutes. Remove mushrooms and their liquid, and set aside.

Add 1 tablespoon olive oil to skillet, and stir in the shallots. Cook 1 minute. Add rice, stirring to coat with oil, about 2 minutes. When the rice has taken on a pale, golden color, pour in wine, stirring constantly until the wine is fully absorbed. 

Add 1/2 cup broth to the rice, and stir until the broth is absorbed. Continue adding broth 1/2 cup at a time, stirring continuously, until the liquid is absorbed and the rice is al dente, about 15 to 20 minutes.

Remove from heat, and stir in mushrooms with their liquid, butter, chives, and parmesan. Season with salt and pepper to taste.