Showing posts with label childhood. Show all posts

Sunday, February 9, 2014

Chili Stew (?)

With my FreshDirect, I'm trying to order meat on occasion when I think I'll have a night to attempt to cook it and am brave enough to try (I mess up veggies or baked goods, whatever; I mess up meat or fish, yikes). A while ago (December, to be honest), I ordered some kind of meat and did a wild attempt at my dad's (grandmother's) chili. It turned out in no way like chili because of how much I changed from the original recipe, but it was meaty and warm and edible (sales pitch!). Anyway, it worked for me, especially with some cheese on top, and I had enough for several meals, to which I added polenta several times. I love chili because it ages so well and you can freeze it and the flavors get better. It's a great way to branch into meat cooking because it doesn't threaten me with risky self-assessment of done-ness and is delicious.

Here's my dad's recipe, which I can attest to being delicious. The recipe as he passed to me is in spreadsheet format with stages separated into numbered sections. Welcome to why I'm an excel nut.

Ingredients for A (Stage 1)
3.0 Red chilies or Jalapeno [fresh] chopped
3.0 Green Anaheim or Ordinary
3.0 tbsp. Cumin seed
6.0 Cloves of Garlic-chopped
3.0 Onions-chopped
4.0 lbs. Beef [chili cut]
2.0 lbs. pork sausage
2.0 tbsp. cooking oil

Ingredients for B (Stage 2)
3.0 oz Jar of chilipowder [Gerhard]
1.0 tsp. Oregano
2.0 tbsp. Paprika
2.0 tbsp. Vinegar
0.5 cup boiling water
2.0 can beef stock
1.0 can jalapeno chopped
2.0 14oz  can tomatoes
1.0 pc chopped celery
1.0 tbsp. Worchester
0.5 cup beer
6.0 cloves

Ingredients for C (Stage 3)
0.5 cup beef broth
2.0 tbsp. Mesa corn meal
Salt and Pepper

Pinto or Kidney beans

Instructions
A Lightly brown meet cook for 30 min
B Cook for 45 minutes
C Cook for 30 minimum 30 minutes
D Beans on side or mix some

Now what that all means, obviously, is that you put all of the ingredients in A together in the pot and lightly brown the meat and then cook for 30 minutes. Once that's happened, add in all the B ingredients and cook for 45 minutes. Then add in C ingredients and cook for at least 30 minutes. You are then free, in step D, to do what you wish with the beans.


Thursday, January 12, 2012

dad's strawberry shortcake

Ah, a childhood favorite. My dad made this a lot while I was in middle and high school, and it is one of my all time comfort foods. When I was in Morocco, I went on a trip to London and saw a box of bisquick in the store. I bought it and brought it to Casablanca with me, and Eryn and I loved making strawberry shortcake as a special treat. It is super simple and yummy and just makes me so darn happy. I always serve it with milk and sugar sprinkled on top, but to each his own.

*recipe from the box of bisquick


3 tablespoons white sugar
2 1/3 cups Bisquick baking mix
1/2 cup whole milk [or whatever kind you like]
3 tablespoons butter

Preheat oven to 425 F. Combine dry ingredients. Mix in milk and melted butter. Shape into individual shortcakes. The flatter, the more cooked through they will be once they are golden brown. Cook 10-12 minutes.

Thursday, September 29, 2011

Davis strawberry cake

My little sister is turning 22 today! How did we get so old? I mean, I recognize that we are not old, but we both are officially adults, and it is strange. For her birthday, she requested that I make this cake that her best friend's mom made them in high school. So the mom sent it to her and she passed it along to me. It isn't the kind of thing I would normally make since it uses cake mix as an ingredient and I prefer to make everything from scratch, but it is for the birthday girl. I looked up a whipped cream cheese frosting recipe from allrecipes. She also requested that it not be done as cupcakes, which we all know is how I like to do things, so again, birthday girl got her way. It was a pretty tasty cake, I will say. I'm still not totally sold on using mixes vs. homemade (it wasn't really that many less steps not to add my own baking powder, salt, flour, etc), but it did taste good. I didn't even get a bite of one of the strawberry chunks, so I'm curious how that played out.


Happy Birthday boo! I love you! I'm so glad we live in the same city again and can hang out (even if it is a crazy, last-minute trip to go schlep your babysitting kids around together)


Strawberry Cake

1 (18.25 ounce) package white cake mix
1 (3 ounce) package strawberry flavored gelatin
2/3 cup vegetable oil
4 eggs
3 tablespoons all-purpose flour
4 ounces frozen strawberries
1/2 cup buttermilk
Directions

Thaw and drain the frozen strawberries.
Preheat oven to 350 degrees F (175 degrees C). Lightly grease on 9x13 inch cake pan.
Combine the white cake mix, strawberry gelatin, oil, eggs, flour, thawed strawberries, and buttermilk and mix until just combined. Pour batter into prepared pan.
Bake at 350 degrees F (175 degrees C) for about 25 to 35 minutes or until a toothpick inserted in the center comes out clean.

Frosting

1 (8 ounce) package cream cheese, softened [I used the 1/3 less fat version]
1 cup white sugar
1/8 teaspoon salt
1 teaspoon vanilla extract
1 1/2 cups heavy cream

In a large bowl, beat cream cheese, sugar salt and vanilla until smooth. In a small bowl, whip the heavy cream until stiff peaks form. Fold into the cream cheese mixture.

*To ice the cake, I put it in the fridge for about 20 minutes to help firm it up. I have heard and experienced that a colder cake takes icing better, so I try to budget that into my schedule.
**I also had a good amount of icing left over that I didn't use, but had I baked the cake in two layers as I had planned on doing, the remaining would have been needed to ice between the layers.

Nutritional information (for 1/14 of cake only)
269 calories
13g total fat
34g carbs
4g protein

Nutritional information (for 1/14 of frosting only)
207 calories
15g total fat
17g carbs
1g protein

Thursday, June 16, 2011

beer bread

When I was in high school, my two best friends, Katy and Laura, showed me how to make beer bread. If you have self-rising flour, its an astonishing 4 ingredient recipe. Laura and I would bake beer bread and make peanut butter-honey cracker sandwiches for track and cross country meets. Katy and I would sneak down to her kitchen in the middle of the night and bake beer bread, tipsy of sips of her mom's liquor cabinet or beers. To this day, some of my fondest memories are those I have had giggling in the kitchen with my best girl friends over the years.

I have tried to make beer bread a couple times in Bulgaria. It hasn't been successful. Each time, I must have mismeasured the beer or another ingredient, and it just hasn't come out as the simple goodness that I know it can and loves to be. The last time I went to the grocery store, recently frustrated by a horrendously bad batch, I splurged 3 лева ($2) on a Corona. I wanted to make beer bread that was good, and if it took buying imported beer so I was using more familiar ingredients, then so be it. I carefully measured and rechecked the recipe. I tasted the last sip of Corona and wished that it, too, came in 500 ml bottles instead of 335 so that I could have a drink while the bread cooked. Then I stuck it in the oven and watched it rise, get its buttery coat, and turn into a deliciously browned butter crusted loaf. My beer bread was back in business. Phew. I still want to make little beer bread muffins, but I needed a success under my belt before my confidence returned and I could experiment again.


3 cups flour
3 teaspoons baking powder (omit if using Self-Rising Flour)
1 teaspoon salt (omit if using Self-Rising Flour)
1/4 cup sugar
1 (12 ounce) can beer
1/4 cup melted butter

Heat oven to 375 degrees.

Mix dry ingredients together. Pour beer in and stir. Dough will be very sticky. Pour into a buttered loaf pan.

Cook for an hour. Halfway through, melt butter and pour over top of loaf. This will make a delicious buttery crust that is essentially the reason I make and dream of this recipe.

Wednesday, June 8, 2011

oatmeal pancakes and homemade "syrup"

This Monday night, I was feeling like breakfast. Well, I guess I wasn't feeling like breakfast (would that be squishy?), but I wanted to eat it. Abby had made a delicious make-your-own pizza night on Sunday, so I felt like switching things up for my night. At first I just wanted to go with classic pancakes and fried eggs, but then I realized that without maple syrup (because really, I'm not paying $15 or 20 лева for that), normal pancakes might be a letdown for my roommates. And my old friend, SK, did not let me down. In my recipe search for pancakes (search results included the lemon ricotta ones I made a while ago), I found one for oatmeal pancakes. They sounded healthier and delicious, so I decided to give them a go. I had to do some preparatory work google translating 'oat flour' and then extrapolating, in store, that обесено трици was similar enough to обесено брашно that it wouldn't ruin my recipe (брашно is flour and трици is bran).

I also made a few with bananas because, just like my dad, I love me some banana pancakes. They just make something delicious (pancakes) even better (caramelized heaven). You don't even need syrup if each bite includes that crystallizing sugary goodness! Also, for my Nabokov-Pynchon classmates (or any other Pynchon readers out there), every time I eat anything with bananas, but especially pancakes and breakfast foods, I can't help but think about the banana breakfast in Gravity's Rainbow. Maybe one day I'll get really ambitious (and have a large audience) and attempt a Pynchon/Pirate-esque banana breakfast of my own.

But really, I loved the oatmeal pancakes. They tasted so good and were similar enough to "regular" American pancakes (not the crepe-like палачинки that we have here in Bulgaria) that I didn't feel tricked but also were a bit more hearty and whole grain tasting.

But if you DO need syrup, you can try what I tried. I didn't really know what to expect, but via my browsing on SK, I found a link to a cranberry syrup that she made. I had bought some jarred fruit/jams in Koprivshtitsa in the fall, and I only liked some of them. There is some small berry here that I have never had before, and the flavor is just a bit too strange for me to really get excited about it. I wanted to like that jam, but I just couldn't do it. So I decided to use it in my syrup experiment and wouldn't cry about it if I ended up having to throw it out. It turned out to be not terribly thick but sweet and yummy, and we used it successfully as a syrup substitute for the pancakes.
Dry sugar melting:
 Melted sugar:
 Hardened sugar (after adding water and berries):

 Berry syrup:
 Oatmeal pancake batter:
 Banana pancakes:

Oatmeal Pancakes

3/4 cup oat flour (you can make this by pulsing rolled oats into a food processor or spice grinder until finely ground; 1 cup of oats yielded 3/4 cup oat flour for me) [as mentioned, I used oat bran and it worked]
1 cup all-purpose flour
2 tablespoons sugar
2 teaspoon baking powder
3/4 teaspoon Kosher or coarse salt
3 tablespoons unsalted butter, melted and cooled slightly (plus extra for the pan)
1 1/4 cups whole milk
1 cup cooked oatmeal*
1 tablespoon unsulphured (not blackstrap) molasses or 1 tablespoon honey [I used honey]
2 large eggs

Whisk the dry ingredients (oat flour, flour, sugar, baking powder and salt) together in a large bowl. In a smaller bowl, whisk the butter, milk, cooked oatmeal, honey and eggs together until thoroughly combined. Gently fold the wet ingredients into the dry ingredients. Using a light hand is important for tender pancakes; the batter should be slightly thick with a holey surface.

Heat a 10-inch cast-iron pan or griddle over medium heat until water sizzles when splashed onto the pan. Lower to medium-low. Rub the pan generously with butter; Boyce says this is the key to crisp, buttery edges. Working quickly, dollop 1/4-cup mounds of batter onto the pan, 2 or 3 at a time. Once bubbles have begun to form on the top side of the pancake, flip the pancake and cook until the bottom is dark golden-brown, about 5 minutes total. If you want banana (or other fruit/nuts), place them in after pouring the mounds down and just press lightly into the pancake. Then when you flip them, they caramelize into an almost decadent treat.


Syrup

1/3 cup sugar
3/4 cup fresh or thawed frozen cranberries, chopped [I used my rinsed mystery berries from the jar]
1/2 cup water

Cook sugar in a dry 1 1/2-quart heavy saucepan over moderate heat, undisturbed, until it begins to melt. Continue to cook, stirring occasionally with a fork or flat whisk, until sugar is melted and turns a deep golden caramel. Tilt pan and carefully add cranberries and water (caramel will harden and vigorously steam). Simmer over moderately low heat, stirring, until caramel is completely dissolved, then pour syrup through a very fine sieve into a heatproof bowl, pressing hard on solids. Let cool.

Wednesday, May 4, 2011

mexican food

This weekend was the 2nd Annual NACHO COMPETITION amongst the International faculty at ACS. I was very excited about it, not least because the rubric is hilarious. I was a little distracted talking to someone on skype, so I didn't really get my entry ready in time. But I did make some chile con queso, because it is one of my favorite foods of all time and I figured it would be unique amongst regular melted cheese nachos. I was correct. I had a bunch of other ingredients for my planned-but-not-executed nachos, and they turned into dinner tonight plus a few other ingredients. I had to invite a couple of other teachers over to help make sure everything got eaten.

The menu was chile con queso, guacamole, spicy black beans, spicy chicken, and cilantro-lime rice. It featured a little more spice and kick than my normal meal because I had jalapeños in my ingredients for the Nacho Competition and because aforementioned skype friend teased me about not eating spicy foods, so I'm trying to branch out a bit. Plus, I need to get ready to move back to Texas and eat spicy food again.

  • For the chile con queso, I used a recipe that I found after googling chile con queso on both US and Mexico's google sites and decided that this was the one that would work best for me. 
  • For the guacamole, I just used my innate Texas guacamole skills. And it was delicious.
  • The spicy black beans, I just sort of threw some things together as I was heating them up, and I liked the outcome even though it was spicy and I am usually a gigantic spice wimp.
  • The spicy chicken was from a recipe I did a while ago for spicy lime chicken, and I really like it a lot. Plus, it is quite simple. 
  • For the rice, I just cooked rice, which generally is a task unto itself for me, but I am finally starting to get the hang of it. Then I decided to try something new and stirred in some lime juice and fresh cilantro to give it a bit of flavor and to fit the theme of the meal. 


Chile Con Queso 
[note: she says serves four. She must mean 4 linebackers eating it as soup, as this made a GIGANTIC bowl and I didn't even use all the cheese]

1/2 onion diced (about 1/2 cup)
4 cloves of garlic minced
3 Serrano peppers diced [I have no idea what kind of peppers we have here, so I just grabbed one of each]
3 jalapeno peppers diced
2 tablespoons of butter
2 tablespoons of flour
1 cup of milk
6 cups of shredded cheese, can use any combination of Longhorn cheddar and Monterrey Jack
1/2 cup of cilantro, chopped
2 plum tomatoes, peeled and diced (about 1 cup, can use canned if tomatoes aren’t in season)
1/2 cup of sour cream
Salt to taste

1. Melt the butter in a saucepan on medium-low heat, and then cook the onions and peppers for about five minutes or until onions are translucent.
2. Add the garlic and cook for another minute.
3. Whisk the flour into the butter, vegetable mix and cook for about 30 seconds.
4. Add the milk to the pot, and cook on medium, whisking constantly until sauce is thick, about five minutes. Stir in the cilantro and tomatoes.
5. Turn heat down to low, and a 1/4-cup at a time, slowly add the shredded cheese stirring into the white sauce until completely melted. Repeat.
6. Stir in the sour cream.
7. Add salt to taste.

Guacamole
3 avocados
1 tomato
1/4 onion
1 jalapeño
1 clove garlic
1/2 lime juice
cilantro
salt
pepper

Remove avocado however you like. Pour 1/2 lime juice into bowl and mash up avocado pieces to desired consistency. Salt and pepper to taste. Chop up tomato, onion, jalapeño, and cilantro. Mash/dice/press garlic. Mix everything together. Check flavors, refrigerate until ready to eat, and then enjoy! :)

Spicy Black Beans
can of black beans, drained (rinse if you like)
1/2 onion, diced
jalapeños as desired, chopped
1 clove garlic, chopped/diced/pressed
butter/olive oil

Heat up butter/olive oil [I used a combination of both]. Add garlic, onions, and jalapeños. Saute over medium heat until onions are soft. Add in black beans on medium/medium low heat until warm. Serve!

Friday, March 25, 2011

cupcakes on my mind

Why are cupcakes on my mind? Because I can't find cupcake/muffin tins here, so while I was home, I bought like 300 various adorable cupcake/muffin paper cups to bring back here to use for baking. Now it is March and I haven't really used that many up, so I am on a mission to bake through my cute silver big cupcake liners or party themed or pretty red swirl mini cupcake liners. That is the real reason, folks, that I have started a muffin and cupcake streak in the kitchen.

But who's complaining? Not my roommates, yet. So yesterday, unbelievably just yesterday, I made those black bottom cream cheese centered cupcakes. There were 12, the number was down to 6 by bedtime, and the rest were eaten for breakfast or taken in for lunch. Today was a lovely spring day (as was yesterday, so we had our Vonnegut elective outside), so after watching the 10th graders kick the teachers' butts in soccer on the asphalt court (ugh, yeah) and playing a game of bocce outside around the woodsy field between our homes and the campus school buildings, I decided to bake another batch of cupcakes before going out to dinner in Studentskigrad. These were on SK and looked fairly straightforward, so I decided to give them a try. The only thing that didn't turn out so great was that I tried to use food coloring and they didn't really look cute once cooked. What can I say? I've always loved food coloring and my mom has always made fun of me using it in my ice cream and pancake batter and whatnot. It only fits that I would try to turn nice cupcakes into pink and purple blobs.


*I made half the recipe and got 12 regular cupcakes plus 9 small ones


18 tablespoons (2 1/4 sticks) unsalted butter, at room temperature
2 2/3 cups sugar
6 extra-large eggs, at room temperature
1 cup sour cream, at room temperature
1 1/2 teaspoons pure vanilla extract
3 cups all-purpose flour
1/3 cup cornstarch
1 teaspoon kosher salt
1 teaspoon baking soda

Heat the oven to 350 degrees F. Line muffin pans with paper liners.

Cream the butter and sugar in the bowl of an electric mixer fitted with the paddle attachment on high speed, until light and fluffy. On medium speed, add the eggs, two at a time, then add the sour cream and vanilla. Scrape down the sides and stir until smooth.

Sift together the flour, cornstarch, salt, and baking soda in a bowl. With the mixer on low speed, add the flour mixture to the butter mixture until just combined. Fill the cupcake liners to the 2/3-level with batter. Bake in the center of the oven for 20 to 30 minutes, until a toothpick comes out clean. Cool to room temperature.

For the icing, I used a different recipe for a very simple butter cream icing.


5 oz (150g) Butter - softened
8 oz (250g) confectioners (icing) sugar
1 tsp vanilla
2 tsp hot water

Beat together the butter and sugar with an electric beater.
Once well combined, add the vanilla and water. Beat until smooth and creamy.

Tuesday, February 15, 2011

Martha's Sugar Cookies

In the small cookbook cupboard of Pink House, we have quite the cookie cookbook by Martha Stewart. It has lovely pictures of all the cookies for the table of contents as well as spread throughout the book with the recipes. My roommates have made a few of them before, but this was my first experience with Martha. I really love plain sugar cookies and have been hankering to make them for a week or so now. I kept planning on baking them this weekend, but I was so busy doing things like playing Settlers and going out to eat and watching tv that I didn't get around to it.

But last night, as I was going to sleep, I had visions of white, pink, and red sugar cookies dancing through my head and I knew that it would be my Valentine's day gift to my roommates at Pink House. Also, I love playing with food coloring. When I was a kid, I used to make pancakes on the weekends with my parents, and I would always make them weird colors. My mom would try to convince me not to and remind me that green pancakes weren't necessarily appetizing, but I was enamored. I also used to mix my Blue Bell Ice Cream (the best in the world, to my well-sample tongue) until it turned to liquid and then stir in food coloring. So this multi red hued experience was a good Valentine's Day gift for myself as well.


Old Fashioned Sugar Cookies

3 cups flour
1 tsp baking soda
1/4 tsp salt
1 3/4 cup sugar
1/4 cup light brown sugar
1 tbsp grated lemon zest
1 cup / 2 sticks unsalted butter, room temperature
2 large eggs
1 tbsp fresh lemon juice

Preheat oven to 350 degrees.

Sift or whisk together flour, baking soda, and salt.

In another bowl, put in both sugars and zest. Mix with an electric mixer on medium for 30 seconds. Then mix in butter until pale and fluffy, about 1 minute. Mix in eggs one at a time, and then the lemon juice. Reduce speed to low and gradually mix in the flour mixture.

Drop dough onto parchment paper with a 2-inch ice cream scoop (I use tbsp spoons) about 3 inches apart. Flatten slightly. Bake for 15 minutes until golden. Cool on wire rack.

Martha advises sprinkling with sanding sugar, but I just let mine be as is. I also separated the batch into 4 different smaller balls and mixed in varying amount of red food coloring with each. 

Tuesday, October 19, 2010

blueberry muffins, cornbread, and vegetarian chili

I have been studying for the GREs lately (which has been a series of ups and down, frustrations, and sobbing calls home to my stepdad and mom), so not cooking too much lately, but I did make blueberry muffins on Friday as a therapeutic release from my workweek. I have been grading like crazy for the past week and a half and I can't seem to recover. I know I am the one assigning the work, but they need to do it, and then, however cursory my grading is, it still takes me an hour or two to grade one assignment so I am constantly handing back work in a timely fashion but accumulating things nonetheless. Anyway, I have had a few things to cook either by necessity or for a few moments of pleasurable focus and attention.


Friday, I made blueberry muffins and Monday, for my dinner, I made vegetarian chili and corn muffins. So here are the recipes and some pictures. Tonight was the first actual book club meeting for our first book, and Lindsay and I hosted, so I will make a new entry for my epic Peanut Butter Chocolate Cake which is definitely cavity causing and so rich it hurts.

***


Like all my recipes, all the ones I used were from SK and I'll go in chronological order. First, her "
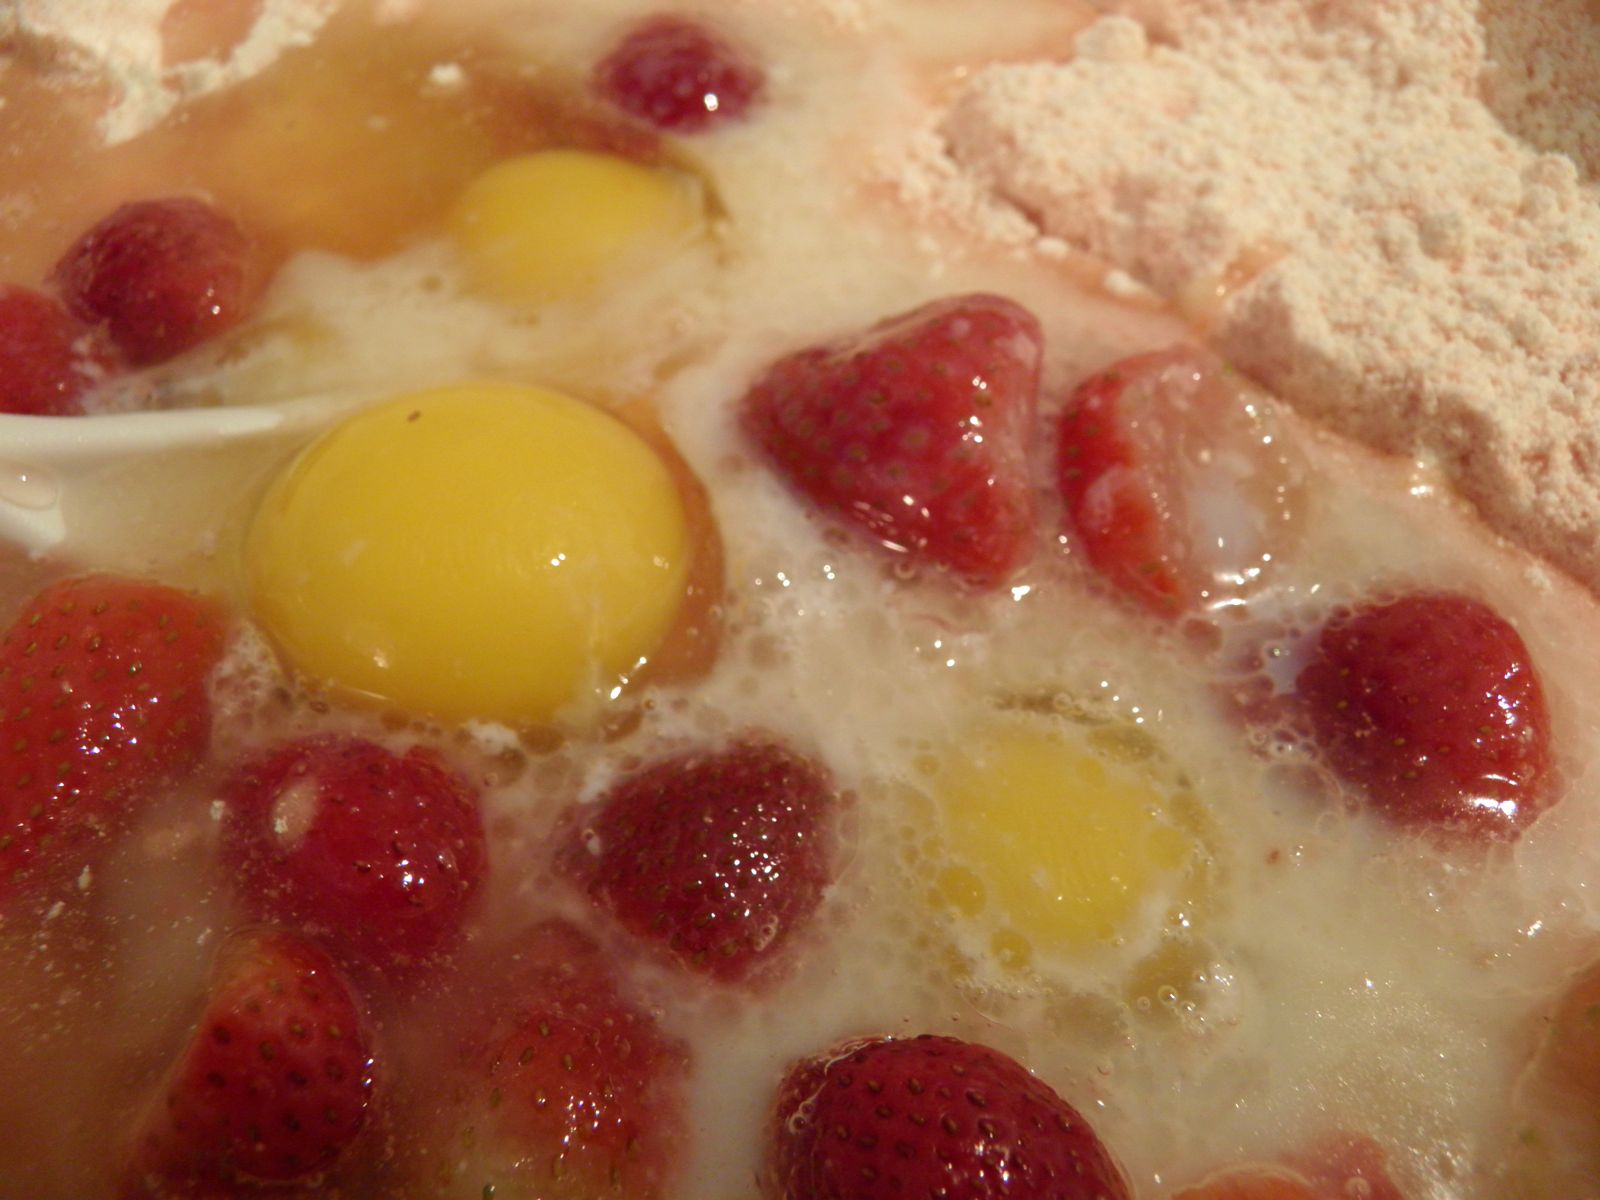
perfect blueberry muffins" were a nice treat and definitely had a slightly different texture and flavor than most blueberry muffins (thicker, hint of citrus). I really appreciated the various measurements for each thing because I cook largely measuring in grams, living abroad, and am constantly consulting our yellowed conversions page from a cookbook taped inside a cupboard door.

Ingredients:

5 tablespoons (2 1/2 ounces or 71 grams) unsalted butter, softened
1/2 cup (3 1/2 ounces or 100 grams) sugar
1 large egg
3/4 cup sour cream or plain yogurt
1/2 teaspoon grated lemon zest
1 1/2 cups (6 3/4 ounces or 191 grams) all-purpose flour
1 1/2 teaspoon (7 grams or 1/4 ounce) baking powder
1/4 teaspoon (1 gram) baking soda
1/4 teaspoon (2 grams) salt
3/4 cup (3 3/4 ounces or 105 grams) blueberries, fresh or frozen (if frozen, don’t bother defrosting)


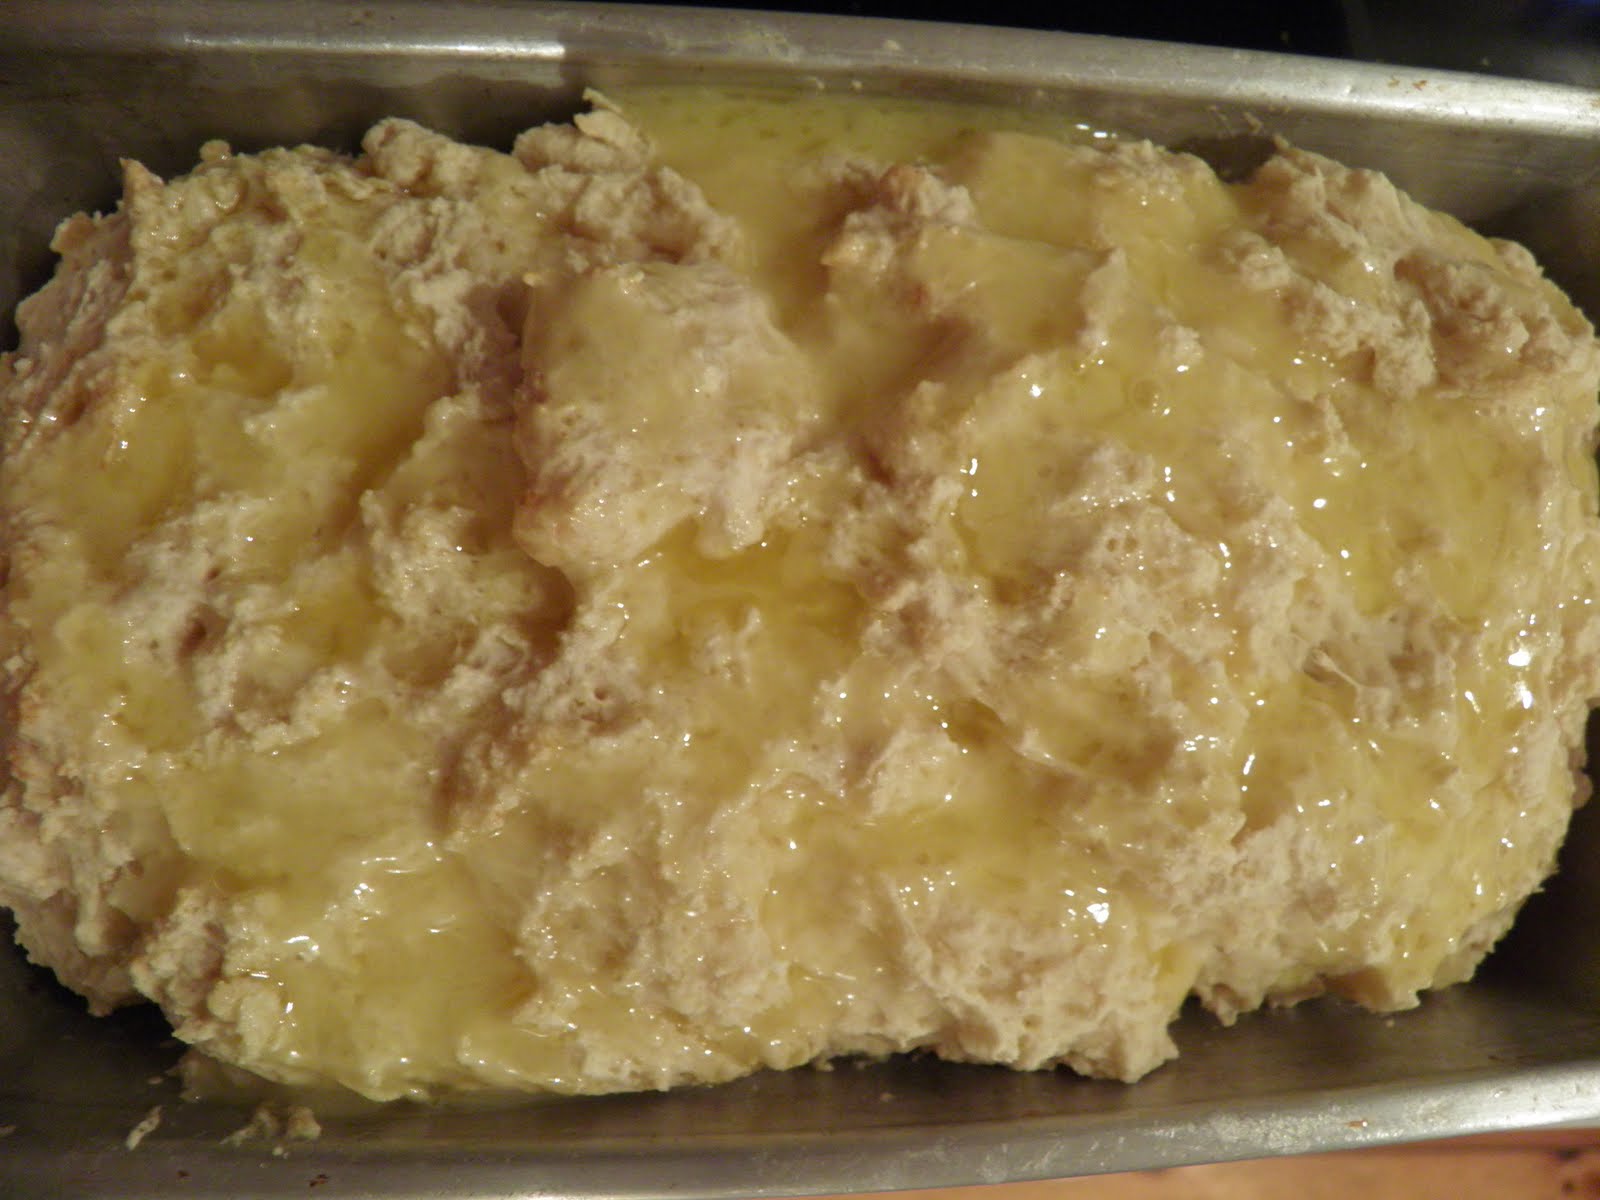
I pretty much followed her recipe without making too many adjustments and changes. Preheat oven to 375 degrees (or whatever celsius it was that I crank my oven to). Beat butter and sugar with electric mixture until fluffy - for me, this did not seem possible at first, but I kept throwing chunks of butter and sugar around until they did, surprisingly, come together. I added in the egg, beat everything together, and then my yogurt and lemon zest (I didn't measure, just grated it in, eyeing the pile). I use Greek yogurt whenever I cook and since some things aren't available - substitute it for sour cream, creme fraiche, anything of similar dairy texture. The yogurt in this recipe is what facilitates the thickness of the mixture and weight in the muffins, which SK mentions holds the blueberries better in the muffins instead of having them sink to the bottom. After the yogurt is mixed, sift the dry ingredients in slowly (flour, baking powder, baking soda, salt), mixing intermittently, until batter absorbs all the flour. Gently add in the blueberries and the batter is somewhat like cookie dough and feels sticky and thick. In a greased muffin tin (I save my butter wrappers, which I quickly accumulate, for rubbing on baking sheets and such and find it a useful replacement for a cooking spray and satisfies my Irish need to use everything to the last drop, so to speak), pour/glob in the batter. I filled a standard 12 muffin tin with the recipe and I think just over half full tins led to full, standard size muffins, so don't worry if it looks a little scant - they rise well. They bake for 25 to 30 minutes, until the tops are golden brown. I really enjoyed mine warm with some nice lightly salted butter. They were also good reheated later in the microwave with, of course, some more butter. They lasted less than 24 hours, but I did take them to a dinner party and pawn off 7 or 8 there.


***

My Monday night dinner, as mentioned, was cornbread and vegetarian chili. Lindsay had made meat chili on Sunday night and I figured we would have leftovers of meat chili and I would make a vegetarian version for the vegetarian housemate (clever, aren't I?). For the cornbread, I followed the recipe pretty closely. I actually didn't love it as much as the classic and simple Jiffy cornbread, but they were good and were eaten within a day, so still met my standards for cooking.


Ingredients:

1 cup all-purpose flour
1 cup yellow cornmeal
6 tablespoons granulated sugar
2 1/2 teaspoons baking powder
1/4 teaspoon baking soda
1/2 teaspoon salt
Pinch of freshly grated nutmeg (optional)
1 cup buttermilk
3 tablespoons unsalted butter, melted and cooled
3 tablespoons corn oil (sunflower oil was what I had in my kitchen)
1 large egg
1 large egg yolk
1 cup corn kernels (I used canned, rinsed)


Preheat over to 400 degrees. Whisk together flour, cornmeal, sugar, baking powder, baking soda, salt, and nutmeg. Separately, mix the buttermilk (I just used full fat milk), melted butter, oil (I used sunflower oil because that is a Bulgarian product and readily available), egg and extra yolk. Pour liquid over dry ingredients and mix together quickly but gently. Stir in the rinsed corn kernels (SK says you can use fresh, but I didn't, so I don't know how that would affect the recipe), and your lumpy batter is ready to go. I greased up my muffin tin again and poured them in. Bake for 15 - 18 minutes until golden brown. I served them with chili, but also had out butter and honey because that is how my mom usually tops them, though we also regularly had cornbread with applesauce. Apparently, this isn't common practice, but I have always found it really delicious and comforting.


***

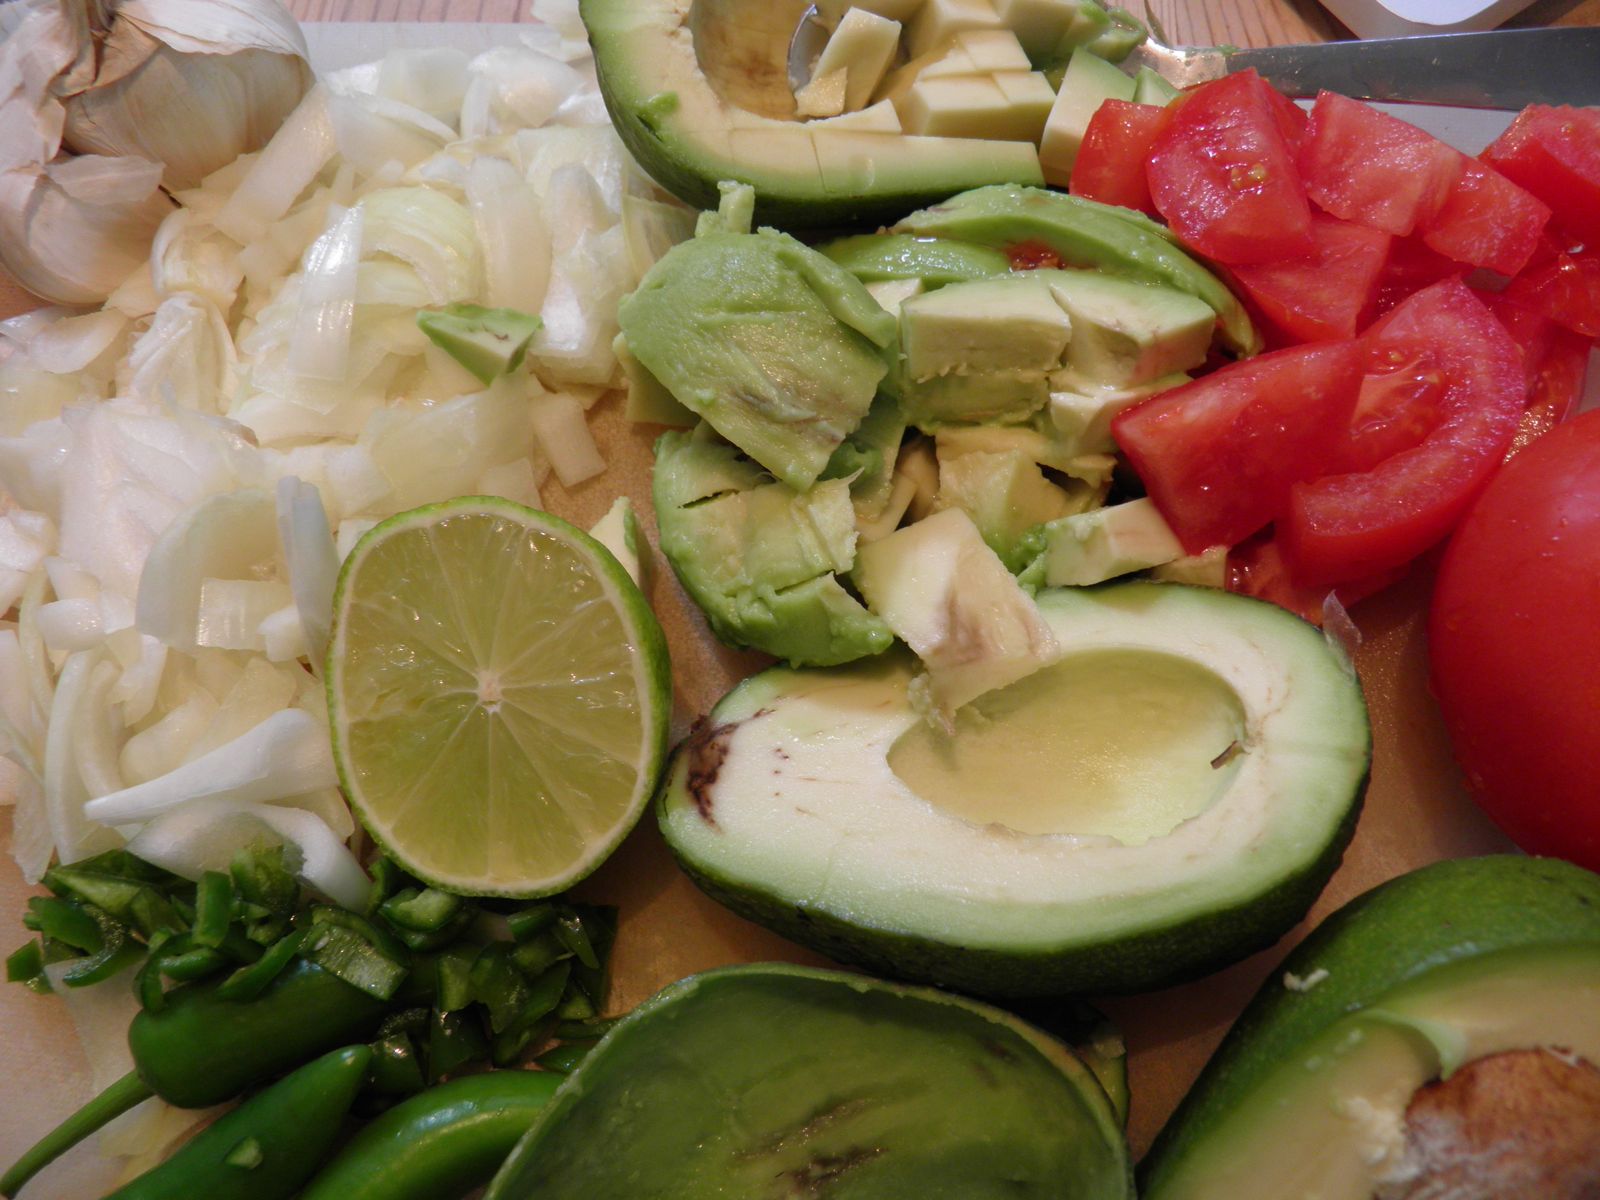
For the vegetarian chili, I used SK's recipe as a guideline, but definitely improvised with what was available and didn't really measure my spices and just sprinkled them on throughout the process. I went ahead and adjusted the ingredients to what I used, but go to her site if you are interested in her recipe, which has a few more ingredients and specific measurements.

Ingredients:

1 tablespoon vegetable oil
1 onion, diced
1 15-ounce can of white beans, drained and rinsed
1 15-ounce can of kidney beans, drained and rinsed
1 cup corn (canned, rinsed)
1 15-ounce can whole tomatoes
1 cup water with bouillon cube
2 tablespoons chili powder
1 1/2 teaspoons cumin
1 teaspoon ground coriander
1 tablespoon unsweetened cocoa


I sauteed the onions in the vegetable oil first, not until completely transparent and soft, but so that they developed some flavor and caramelization on their own first. Then I added in the garlic briefly, so as not to burn (done that a few times), and then poured in the water and bouillon cube to get it to dissolve first. Then I added the drained beans and tomatoes with their sauce, and jabbed the tomatoes a bit to break them up. Our bean selection here is limited, so I only had kidney and white beans, in her recipe she calls for black, pinto, and kidney, which I would have used given availability. My chili turned out well, though, and didn't feel lacking with just the two varieties. I measured out the cocoa and then just added chili powder, cumin, and coriander as I felt appropriate (mostly just continued shaking them in intermittently throughout cooking because I wanted to make sure it wasn't boring and had a kick because my roommate likes spicy food). I also added some of the corn left over from my cornbread muffins as well as some salt and ground pepper. I let it cook for about 30-45 minutes on medium heat, stirring occasionally. I thought it turned out really well and the great thing about chili is that it just gets better with time, so it is one of the few foods I enjoy having leftovers with because the flavors just continue to develop and intensify in the fridge or freezer.

I generally make my dad's non-vegetarian chili and I will have to cook that sometime and post it. He usually serves his chili with rice and I like that, but I sort of ditzed out and forgot to make it with this recipe, so we just had it topped with cheese (necessary) and served with cornbread muffins. I think everyone felt pretty satisfied with that.

I didn't take too many pictures of the chili (read: one) because it just doesn't photograph that well. Much more delicious than visually appearing, and one of my favorite fall/winter comfort foods.