Showing posts with label soup. Show all posts

Sunday, February 9, 2014

Chili Stew (?)

With my FreshDirect, I'm trying to order meat on occasion when I think I'll have a night to attempt to cook it and am brave enough to try (I mess up veggies or baked goods, whatever; I mess up meat or fish, yikes). A while ago (December, to be honest), I ordered some kind of meat and did a wild attempt at my dad's (grandmother's) chili. It turned out in no way like chili because of how much I changed from the original recipe, but it was meaty and warm and edible (sales pitch!). Anyway, it worked for me, especially with some cheese on top, and I had enough for several meals, to which I added polenta several times. I love chili because it ages so well and you can freeze it and the flavors get better. It's a great way to branch into meat cooking because it doesn't threaten me with risky self-assessment of done-ness and is delicious.

Here's my dad's recipe, which I can attest to being delicious. The recipe as he passed to me is in spreadsheet format with stages separated into numbered sections. Welcome to why I'm an excel nut.

Ingredients for A (Stage 1)
3.0 Red chilies or Jalapeno [fresh] chopped
3.0 Green Anaheim or Ordinary
3.0 tbsp. Cumin seed
6.0 Cloves of Garlic-chopped
3.0 Onions-chopped
4.0 lbs. Beef [chili cut]
2.0 lbs. pork sausage
2.0 tbsp. cooking oil

Ingredients for B (Stage 2)
3.0 oz Jar of chilipowder [Gerhard]
1.0 tsp. Oregano
2.0 tbsp. Paprika
2.0 tbsp. Vinegar
0.5 cup boiling water
2.0 can beef stock
1.0 can jalapeno chopped
2.0 14oz  can tomatoes
1.0 pc chopped celery
1.0 tbsp. Worchester
0.5 cup beer
6.0 cloves

Ingredients for C (Stage 3)
0.5 cup beef broth
2.0 tbsp. Mesa corn meal
Salt and Pepper

Pinto or Kidney beans

Instructions
A Lightly brown meet cook for 30 min
B Cook for 45 minutes
C Cook for 30 minimum 30 minutes
D Beans on side or mix some

Now what that all means, obviously, is that you put all of the ingredients in A together in the pot and lightly brown the meat and then cook for 30 minutes. Once that's happened, add in all the B ingredients and cook for 45 minutes. Then add in C ingredients and cook for at least 30 minutes. You are then free, in step D, to do what you wish with the beans.


Wednesday, February 1, 2012

ginger carrot soup

I had found a recipe on SK for a carrot soup, but I couldn't find white miso paste at HEB, so I had to find another recipe. I used this one from food network. Well the ginger isn't the strongest flavor here, and the soup definitely tastes like carrots. I liked it though. I added some extra spices - paprika and cumin. I didn't add much, so there's definitely room for more flavor if you want to experiment. It wasn't something I fell in love with right away, but I ended up having it a few times and liking it. It tastes like carrots, but it works.


*this was the adjusted recipe that I used

1 tablespoons sweet cream butter
1 onions, peeled and chopped
3 cups chicken broth
1 pounds carrots, peeled and sliced
1 tablespoons grated fresh ginger
.5 cup yogurt
Salt and white pepper

In a 6-quart pan, over medium high heat, add butter and onions and cook, stirring often, until onions are limp. Add broth, carrots, and ginger. Cover and bring to a boil. Reduce heat and simmer until carrots are tender when pierced.

Remove from heat and transfer to a blender. Don't fill the blender more than half way, do it in batches if you have to. Cover the blender and then hold a kitchen towel over the top of the blender*. [I used my immersion blender in the pot.] Be careful when blending hot liquids as the mixture can spurt out of the blender. Pulse the blender to start it and then puree until smooth. Return to the pan and add yogurt, stir over high heat until hot. For a smoother flavor bring soup to a boil, add salt and pepper, to taste.

Ladle into bowls and garnish with dollop sour cream and parsley sprigs.

*When blending hot liquids: Remove liquid from the heat and allow to cool for at least 5 minutes. Transfer liquid to a blender or food processor and fill it no more than halfway. If using a blender, release one corner of the lid. This prevents the vacuum effect that creates heat explosions. Place a towel over the top of the machine, pulse a few times then process on high speed until smooth.

Wednesday, January 11, 2012

broccoli soup

I've been sickly for the past week or so. Last week, I started to feel less than well, and one day I really wanted soup. I didn't want to go buy any or bother with the grocery store, and my mental catalogue of ingredients in my kitchen largely seemed blank other than frozen broccoli. Broccoli soup seemed like it would work, and this recipe either had ingredients I felt comfortable leaving out or had on hand (or a reasonable substitute). It was quick, easy, and gave me something warm and soothing to eat in bed. Then I went home for the weekend and got to have my mom take care of me (including a broccoli soup of her own!).

This is how much I made, which gave me two bowls of soup.

2 teaspoons butter
1 clove garlic [I added this, who doesn't want garlic?]
3/8 onion, chopped [omitted, but would have helped]
3/8 stalk celery, chopped [omitted, but would have been good]
1 cup chicken broth
2-3 cups broccoli florets [mine were frozen]
1 tablespoon butter + 1 tablespoon all-purpose flour [this is for thickening, I substituted 1/2 tbsp corn starch + water]
2/3 cup milk [I just used a bit of yogurt; creme fraiche also works]
ground black pepper to taste
grated parmesan [I added this, I love cheese]

Melt 2 tablespoons butter in medium sized stock pot, and saute onion and celery until tender. Add broccoli and broth, cover and simmer for 10 minutes.

Pour the soup into a blender, filling the pitcher no more than halfway full [I used my immersion blender in the soup, keeping it in the pot]. Hold down the lid of the blender with a folded kitchen towel, and carefully start the blender, using a few quick pulses to get the soup moving before leaving it on to puree. Puree in batches until smooth and pour into a clean pot. Alternately, you can use a stick blender and puree the soup right in the cooking pot.

In small saucepan, over medium-heat melt 3 tablespoons butter, stir in flour [or mix cornstarch and water together and then stir that in] and add milk [or yogurt]. Stir until thick and bubbly, and add to soup. [If you are going the cornstarch route, you just mix that separately, cold, and stir it into the soup and can mix the milk/yogurt directly in.] Season with pepper and parmesan and serve.

Nutritional information (for 1/2 of recipe, including grated parmesan)
183 total calories
10g total fat [from butter and parmesan]
11g total carbs
12g protein

Thursday, November 17, 2011

tomato soup

I found this simple tomato soup recipe via a google search, and I liked that it even had an image of the original recipe, en français. To be honest, my recipe didn't turn out as well as theirs sounded like it did, but I think I know where to attribute the problems. No. 1: laziness; I didn't chop up the tomatoes beforehand, which certainly should make a difference with consistency. No. 2: I drained the tomato juice before putting the tomatoes in, and now I'm thinking that maybe it was supposed to be part of it. The recipe isn't really clear on that. But that is why I like using cooking blogs with pictures, cause I can double check things. No. 3: I actually don't have a No. 3 because I'm pretty sure I followed the rest of it. As an aside, I made 1/2 the recipe, and it was about 2 servings.

Anyway, what was wrong is that mine was too thick, but it tasted pretty good. The next time I make tomato soup, and I will, it will be from SK because I have my eye on a recipe she made that looks amazing. My only concern is my lack of oven-safe mugs.


3 pounds fresh or canned tomatoes, peeled, seeded, and chopped
1 onion, chopped
1 clove garlic, chopped
1 bay leaf
several sprigs of thyme (or 1/4 teaspoon dried)
1 Tablespoon olive oil
1/2 teaspoon brown sugar
1 pinch nutmeg
1 pinch paprika
1 egg yolk
2 Tablespoons creme fraiche
salt and pepper
Garnish: 1/4 cup freshly grated Parmesan and thinly sliced basil leaves

In a large saucepan, stir together all the ingredients except the egg yolk and creme fraiche, bring to a boil, and cook on medium heat for 40 minutes. Remove the thyme sprig and bay leaf, turn heat to high, and bring to a boil for a minute or two. Puree in a blender, return to the pan, then reheat at a simmer. Right before serving, beat the egg yolk with the creme fraiche. Whisk the egg-creme fraiche mixture into the pot and cook, stirring, on low heat until the soup thickens.

When ready to serve, set out the soup plates (warming them is nice), ladle in the soup and top with Parmesan and slivers of basil leaf. Serve immediately.

Sunday, July 17, 2011

pumpkin/squash soup

Another throwback! In fall of 2009, when I was beginning my cooking exploits, I was talking to my friend Andy online and he told me about a soup that he makes. I don't think we had squash available the next time I went to the market, so I just followed the recipe using pumpkin instead. At least as far as I remember. Anyway, the recipe looks good and what I ended up with tasted good. Plus it was my first foray into cooking homemade soup, which I ended up doing pretty frequently in the cold months. Inevitably, it pretty much cooks itself, tastes good, and makes a lot of food.

As you can see, I'm still trying to figure things out. This probably was one of the first times I used the oven other than to heat bread or cook asparagus (which I only knew how to do because my college boyfriend used to cook us dinner frequently once he graduated and lived on his own; I just sat around, teased him, and looked pretty). Eryn and I liked this soup; it was a bit sweet, but it still worked as a dinner.

In Morocco, our kitchen was pretty limited: cups, plates, bowls, silverware, three pots, one skillet, knives that I routinely bent/broke until Courtney sent me a nice set of three stainless steel ones (thank you!), and that's pretty much it. Did I mention measuring cups or spoons (or blenders or any other fancy gadgets)? Nooo. Because I didn't have them. So I used actual cups and spoons and eyed it. Recipes like Andy's were nice because I could just sort of estimate and it was fine. And since I had no choice but to measure imperfectly and just try it out, it gave me confidence when using formal recipes (like SK) to just do my best with what I had. If I was missing a spice or a particular type of cream, I just used what was similar (like in this recipe, I just mashed it up as much as I could). I estimated what a teaspoon might be or a 1/4 cup. The food generally turned out fine. Probably not perfect, but fine. It kept me trying things and experimenting, and now I'm rarely discouraged by a recipe because it looks difficult or complicated. I know to just do the best I can with what I have.


Andy’s Butternut Squash and Apple Soup
butternut squash (or pumpkin)
4 apples, quartered and cored (next time, I would maybe leave the skin on because it is so flavorful, especially if you do have a blender or don't mind chunks)
3 cups of chicken/vegetable stock (or water)
spices, cloves, olive oil
lemon/lime juice


Quarter a butternut squash and rub the exposed flesh with olive oil. Roast on a baking sheet in the oven until soft at 350 degrees for 30-45 minutes. Quarter and core the apples and bake until the flesh is soft.

Let it cool, and scoop it out of the rind with a spoon into a big pot. Add ~3 cups of chicken or vegetable stock (to keep it vegetarian) or water, some spices, maybe a little cloves, salt, and a glug of olive oil. Let it simmer for about 15 minutes. Puree with a blender. You can stir in some acid when you serve it - either lemon or lime.

Monday, June 13, 2011

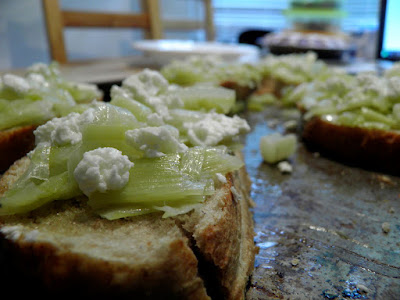
tomato soup and leek toast

My time is Bulgaria is dwindling, and I am starting to evaluate what I have laying around my house that won't go home with me. While I generally shop once a week and only buy food for the meal that I will cook on Monday plus whatever baking I want to do plus lunches, I occasionally accumulate items in my two-shelf pantry. I noticed that I had several cans of chopped or whole tomatoes, which I bought because last year Eryn and I made homemade tomato sauce for pasta or homemade pizza usually once a week, so I figured I would use it more often.

At any rate, I decided that I better make a conscious effort to use up some canned tomatoes or else leave them here (which wouldn't be all that tragic). At first, I was just going to make tomato sauce, but then I decided to try out a simple looking tomato soup recipe. I also realized that I would need something to go along with it to keep everyone from immediately getting hungry, and when I saw SK's leek toast recipe, I thought that would be just the thing. From my earlier experience this year making potato leek soup, I have learned that I quite like cooked leeks, and since the recipe included bread and cheese, how could I say no?


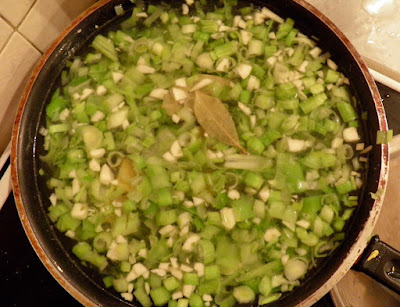
Leek Toast (it took longer to cook than the soup)


1 1/2 pounds leeks (about 3 big leeks), lengthwise and white and pale green parts sliced 1/4-inch thick (about 3 generous cups of slices)
2 tablespoons unsalted butter
1 tablespoon olive oil, plus extra for brushing toasts
Coarse salt
Freshly ground black pepper
6 medium-sized or 12 baguette-sized 1/2-inch slices of bread of your choice
2 ounces blue cheese, crumbled [I used cyrene, which is similar to feta]
Few drops of lemon juice (optional)

Fill a large bowl with cold water. Add leeks and use your hands to pump them up and down in the water a bit, separating the rings and letting the dirt and grit fall to the bottom. Transfer to a dish or plate for a minute; no need to dry them.

Meanwhile, heat a large, heavy skillet over medium. Once hot, add butter and olive oil and once they’re fully melted and a bit sizzly, add the leek slices, still wet. Sprinkle with 1/2 teaspoon coarse salt and a few grinds of black pepper. Reduce heat to low, cover with a lid and cook leeks for 25 minutes, stirring them occasionally. Adjust seasoning to taste.

While leeks cook, brush bread slices with olive oil and sprinkle with coarse salt. Run under broiler until lightly toasted. You may either spread the cheese you’re using on now, while the toasts are hot, or sprinkle it on at the end. Divide leeks among toasts. Sprinkle with cheese, if you haven’t spread it underneath. Add a few drops of lemon juice, if desired. Eat at once or gently rewarm a bit later.

Creamy Tomato Soup
This made quite a bit of soup, enough for four roommates and a bowl or two leftover.


1 medium onion, chopped
2 tablespoons butter or margarine
2 (14.5 ounce) cans diced tomatoes, undrained
2 (10.75 ounce) cans condensed tomato soup, undiluted

1 1/2 cups milk
1 teaspoon sugar
1/2 teaspoon dried basil
1/2 teaspoon paprika
1/8 teaspoon garlic powder
1 (8 ounce) package cream cheese, cubed [I actually didn't include this; I'm sure it makes it creamier and delicious, though]

In a saucepan, saute onion in butter until tender. Stir in tomatoes, soup, milk, sugar, basil, paprika and garlic powder. Bring to a boil. Reduce heat; cover and simmer for 10 minutes. Stir in cream cheese until melted. Serve immediately.

Thursday, February 17, 2011

potato leek soup

I returned to SK for my recipe for dinner this week. Actually, I ended up being the only Pink House dinner, which is exciting for its social implications but not for the health ones. I cooked Sunday night, Monday was Valentine's so the single ladies went to Ugo (уго) for pizza, Tuesday was book club, and Wednesday was parent-teacher conferences (so after 12 hours at school, we just needed food to be handed to us, plus it was one of the teachers birthdays).

At any rate, I felt like I wanted something sort of healthy but also delicious. I found a recipe for Baked Potato Soup and decided to give it a try. In practice, there was a much stronger leek and garlic flavor, likely because I didn't quite follow the recipe, but we still found it very delicious. I ate it for lunch the next few days, and in spite of its less appetizing color, it was really good.

So here is the ingredients as listed with the way that I cooked it instead of the real instructions that SK had. My variations are largely due to my (apparent) inability to read carefully. So it goes. Speaking of Kurt Vonnegut, my fingers are crossed that our elective on him goes through but it isn't looking good. I'm a little sad as I was quite looking forward to a literature discussion class about Slaughterhouse Five and Sirens of Titan, but if it doesn't work out, then so be it.


1 head garlic
3 tablespoons unsalted butter
2 medium leeks, white and light green parts halved lengthwise, washed, and chopped small [I have no idea if I used two leeks or what, it was already chopped and shrink wrapped at the HIT)
5  cups low-sodium chicken or vegetable broth [I used water and bouillon cubes]
2 bay leaves
Table salt
2 1/2 pounds russet potatoes, peeled and cut into 1/2-inch cubes [I left the skins on]
1/3 cup sour cream
Ground black pepper

I found SK's instructions about the garlic rather confusing and I think if I knew how to read the whole recipe first carefully before cooking she had explained how that was all going to play out, I would have followed instructions better. So this is what I did:

Peel off all the outsides of the garlic and get each and every one of those little cloves cleaned off. Then because I can't follow a recipe, I chopped up all that garlic into pieces. Don't worry, the story has a happy ending and the soup tastes good, and you won't kill any vampires (like your boyfriend, Edward) with the amount of garlic in your kiss after eating this.

In one of your bigger pots/pans, melt the butter over medium heat. I used a big silver pan (if only I knew actual categories of cooking instruments. Note to self: learn appliance terms if you are going to tell others how to cook things). Add chopped up leeks and cook them until soft (but not brown), about 5 minutes.

According to SK, you should be doing a variety of things with the different garlic situations you have going on. Since I chopped all mine up together, I just brushed all of it in with the leeks with the broth, bay leaves and 3/4 teaspoon salt. Unlike the recipe's instructions, I turned the heat up to get it to really simmer until garlic was tender, so about 15 to 20 minutes because I had roommates that needed feeding as close to 7 pm as possible, and I was already late.

I looked at my "pan" and the pile of potatoes, so before putting them together and making an absurdly big and hot mess all over our stovetop, I poured the leek mixture into a big pot. Then I added the potatoes with a clear conscious and set those to simmer, partially covered, until potatoes were tender, about 15 to 20 minutes. I was suspicious that potatoes would really get soft that quickly, but they did!

Once everything is soft, discard bay leaves and add the sour cream to soup and cook for another 2 to 3 minutes. Then I turned off the burner and used our handy immersion blender to process the soup until it was a chunky-creamy texture.

I also happened to have steamed some broccoli hanging around the fridge, so along with the grated cheddar cheese, we all mixed some broccoli into the soup as well. 

Thursday, January 20, 2011

Courtney's black bean and pumpkin soup

One of my few sources for recipes other than SK is one of my best friends, Courtney. Here is the almost frighteningly simple recipe that she sent me a while ago for a pumpkin and black bean soup. I keep a recipes document on my computer where I try to keep a list of recipes that I make or copy down recipes that people give me. The other day, I opened up the file to look at something, and I saw Courtney's soup recipe. I recently learned from a roommate that we can actually buy black beans at HIT from the organic section, so when I saw a recipe that used it, looked interesting, and would be a nice winter dinner, I decided to give it a try. To be completely honest, I was a little suspicious to try it out. Pumpkin and black bean don't really go together in my mind, and I wasn't sure if my little changes using real pumpkin instead of canned would make a difference. But I decided to give it a try and let my roommates be guinea pigs yet again, and it turned out really well. In addition to liking it for dinner, I went on to happily enjoy it for three days for lunch.

I decided to break the recipe down into a few more steps, especially because I used fresh pumpkin instead of canned, so I had to go through one or two more steps. All in all, it is still really simple.

Also, I got a new garlic press for Christmas (along with a few other really cute kitchen things - aprons and dishtowls from Ebe, cute bowls from Anthropologie from my "aunt," and cute measuring spoons also from Ebe, I think). The garlic press is a long silver tool, and you press it from side to side across the garlic, and it comes up through the slots. Then you just scrape it out. It is a lot easier to clean than the standard one, so I like it. I have it pictured below with some chopped (soft, yuck) purple onions.


Courtney’s Pumpkin Black Bean Soup

2 cans black beans
1 can diced tomatoes
2 cloves garlic
1/2 an onion
1 tbsp cumin
1 tsp cinnamon
1 tsp all spice
1 can pumpkin
4 cups chicken broth
salt, pepper

My first step was to rub the pumpkin chunks in olive oil and put them in the oven for a while to get them started getting soft. I should have done this earlier to give them like 20 minutes or however long it took to get them really roasted and soft, but I didn't and managed to work it out later.

First sauté onion, garlic, and spices. I didn't add spices right away because my computer was charging, so I was cooking from memory at first. Once I got my onion and garlic sauteed in some olive oil, I put in the spices and mixed it around. It was a fairly dry and clumpy mix, and it made me sort of nervous that it would burn, so I put my pumpkin in, as mentioned, before they were completely cooked. I decided to add two cups of water and two bouillon cubes (we don't have chicken broth, but it's the same either way) and bring that to a boil until the pumpkin was soft.

Once the pumpkin was soft, I turned the heat off briefly and added the other two cups of water and a bouillon cube. I got our immersion blender out and pureed the pumpkin until it was smooth.

If you are using canned pumpkin, you can just saute the onion, garlic, and spices, then add the pumpkin into that, and now we are all on the same page.

Once my pumpkin was blended in, I added the tomatoes and black beans. Courtney said to let it simmer for about 45 minutes, but since I had the pumpkin cooking in the broth and spices for a while before adding the black beans and tomatoes, I only cooked it for another 20 minutes or so. As I said before, we really liked it, and I kept eating it for the next few days for lunch.

Also, here are some pictures of my salad. No, it isn't just because I'm proud that I made a salad (though I am because I never make them and Lindsay always does and hers are so good), but because I put it in our big Bulgarian pottery bowl, and I love the way the painted Bulgarian pottery looks. I should have taken pictures of it all together before Christmas, but I bought my family several pieces of Bulgarian pottery, and it's all really pretty.


Sunday, November 7, 2010

vegetable soup, cheddar apple scones

I haven't been cooking, really, lately because of my trip to Athens last weekend. The week leading up to the trip, I made my Italian host mom's vegetable soup for my Monday night dinner and then cleared out my fridge and pantry so nothing would go back while I was out of town (only for 3 days, but I don't really stock up on much). We got back plenty early on Monday for me to go to the grocery store, but I decided to be lazy and lounge around the house instead. I made Pia's tomato sauce, always simple and delicious, and SK's pizza dough with the alteration of 1/2 cup of wheat flour instead of the 1/2 cup of white flour. I then spent the rest of the week eating peanut butter on rice cakes for breakfast, lunch in the cafeteria, and my roommate's meals for dinner. Thus, it wasn't until Saturday that I made it to the HIT and got groceries (after a delicious stop at the bagel place for bagel sandwiches, oh America, and 12 dozen frozen bagels to go!). I picked out a recipe to cook for dinner tomorrow, which I will post about once it's done, and the cheddar apple scone recipe. It was fun to sort through SK's recent recipes and pick out which ones I want to make. Autumn is a wonderful time to cook.

***

Briefly, Pia's vegetable soup. It is so simple, healthy, and delicious; I love having it as an anytime option. Essentially, you chop up whatever vegetables you want to use, throw them in a pot, pour in a can of diced tomatoes or paste, cover with water (an inch over the top, ignore the floaters), add a couple tablespoons of olive oil and boil. Once the vegetables are all soft, use an immersion blender to puree everything into a smooth soup. Season to taste - I found that it makes a lot of soup and I need a lot of salt to get the flavors to be evident, but I just kept sprinkling and adding until I got there. Add a handful (about 1/4-1/2 cup) of small pasta per person and bring back to a boil for as long as it takes to cook the pasta in the soup. When the pasta is cooked, serve! I like it because it uses potatoes and tomato paste as a base and then you can add in whatever vegetables are around and that you like. It tastes really healthy but still yummy, and was a hit with my roommates. It also made quite a bit of soup, so even after seconds, I had it for lunch for the next four days.


recipe, as I made it on Monday - I starred the items that I added to her basic recipe

2 cups peas
2 medium onions
3 potatoes
3 carrots
1 stick of celery (I didn't include this)
*1 lb chunks of pumpkin
*1 head broccoli, cut into florets
3 tbsp olive oil
salt
water (enough to cover and a little above vegetables)
½ cup tomato paste (I used canned diced tomatoes because it was available)


Pia's instructions (translated):

if water goes down, add hot water while cooking
cook/boil for 30 minutes (until soft)
mix with electric mixer
when its mixed and boiling again, add handful of small-type pasta for each person,
cook until ready

***


Now, onto the cheddar apple scones from SK

I followed her recipe except that I used whole milk instead of heavy cream, because I have yet to find heavy cream here (or maybe I just don't know where to look and how to translate it) and I just used some regular cheddar instead of sharp cheddar because our non-cyrene/kashkaval options are pretty limited. I also was terribly disappointed in myself for my first batch - I don't know what all the symbols on our oven mean, and I must have been on the wrong one because it burned the outsides of the first scones (not terribly but enough to be brown and make me sad) even though they hadn't even cooked the full 30 minutes. I kept a close eye on the second batch and they turned out fine, so that was a relief. And they were quite delicious. 


2 firm tart apples (1 pound or 2 454 grams)
1 1/2 cups (6.75 ounces or 195 grams) all-purpose flour
1/4 cup sugar plus 1 1/2 tablespoons for sprinkling (total of 2.2 ounces or 63 grams)
1/2 tablespoon (7 grams) baking powder
1/2 teaspoon salt (3 grams) plus additional for egg wash
6 tablespoons (3 ounces or 85 grams)unsalted butter, chilled and cut into 1/2-inch cubes plus additional for baking sheet if not lining it with parchment
1/2 cup (2.25 ounces or 65 grams) sharp cheddar, shredded (white is recommended, I assume for aesthetics)
1/4 cup (2 ounces) heavy cream
2 large eggs

Preheat oven to 375 degrees. Peel and core apples, and then cut each into 16ths. Line a baking sheet with parchment, place the apples on, and bake them for 20 minutes. SK says until dry, but mine were pretty juicy - I am not sure if I should have let them go longer or if it was because I used a different type of apple, but they were fine anyway. Set aside to cool.

Sift and whisk flour, sugar, baking powder and salt together. 

In a separate bowl, mix cubed butter, 1 egg, grated cheddar, heavy cream, and apple chunks. I couldn't tell from her instructions exactly the order for all of this, so I put them all in a bowl and mixed them together with a wooden spoon. Then I poured in half the dry ingredients, mixed it a bit, poured in the rest of the dry mix, and mixed it until it came together. It started out really dry, but after some patient mixing, ended up being a sticky wet dough. In my experience, that is pretty standard for scones.

Roll the dough out into a thick circle and cut into 6 (I made 8) triangles. Mix second egg with some salt and brush on top of scones. Sprinkle with sugar. 

Bake on either a parchment lined or buttered baking sheet for about 30 minutes. Keep an eye on them, you don't want yours to burn like mine did. Enjoy!


Tuesday, October 19, 2010

blueberry muffins, cornbread, and vegetarian chili

I have been studying for the GREs lately (which has been a series of ups and down, frustrations, and sobbing calls home to my stepdad and mom), so not cooking too much lately, but I did make blueberry muffins on Friday as a therapeutic release from my workweek. I have been grading like crazy for the past week and a half and I can't seem to recover. I know I am the one assigning the work, but they need to do it, and then, however cursory my grading is, it still takes me an hour or two to grade one assignment so I am constantly handing back work in a timely fashion but accumulating things nonetheless. Anyway, I have had a few things to cook either by necessity or for a few moments of pleasurable focus and attention.


Friday, I made blueberry muffins and Monday, for my dinner, I made vegetarian chili and corn muffins. So here are the recipes and some pictures. Tonight was the first actual book club meeting for our first book, and Lindsay and I hosted, so I will make a new entry for my epic Peanut Butter Chocolate Cake which is definitely cavity causing and so rich it hurts.

***


Like all my recipes, all the ones I used were from SK and I'll go in chronological order. First, her "perfect blueberry muffins" were a nice treat and definitely had a slightly different texture and flavor than most blueberry muffins (thicker, hint of citrus). I really appreciated the various measurements for each thing because I cook largely measuring in grams, living abroad, and am constantly consulting our yellowed conversions page from a cookbook taped inside a cupboard door.

Ingredients:

5 tablespoons (2 1/2 ounces or 71 grams) unsalted butter, softened
1/2 cup (3 1/2 ounces or 100 grams) sugar
1 large egg
3/4 cup sour cream or plain yogurt
1/2 teaspoon grated lemon zest
1 1/2 cups (6 3/4 ounces or 191 grams) all-purpose flour
1 1/2 teaspoon (7 grams or 1/4 ounce) baking powder
1/4 teaspoon (1 gram) baking soda
1/4 teaspoon (2 grams) salt
3/4 cup (3 3/4 ounces or 105 grams) blueberries, fresh or frozen (if frozen, don’t bother defrosting)


I pretty much followed her recipe without making too many adjustments and changes. Preheat oven to 375 degrees (or whatever celsius it was that I crank my oven to). Beat butter and sugar with electric mixture until fluffy - for me, this did not seem possible at first, but I kept throwing chunks of butter and sugar around until they did, surprisingly, come together. I added in the egg, beat everything together, and then my yogurt and lemon zest (I didn't measure, just grated it in, eyeing the pile). I use Greek yogurt whenever I cook and since some things aren't available - substitute it for sour cream, creme fraiche, anything of similar dairy texture. The yogurt in this recipe is what facilitates the thickness of the mixture and weight in the muffins, which SK mentions holds the blueberries better in the muffins instead of having them sink to the bottom. After the yogurt is mixed, sift the dry ingredients in slowly (flour, baking powder, baking soda, salt), mixing intermittently, until batter absorbs all the flour. Gently add in the blueberries and the batter is somewhat like cookie dough and feels sticky and thick. In a greased muffin tin (I save my butter wrappers, which I quickly accumulate, for rubbing on baking sheets and such and find it a useful replacement for a cooking spray and satisfies my Irish need to use everything to the last drop, so to speak), pour/glob in the batter. I filled a standard 12 muffin tin with the recipe and I think just over half full tins led to full, standard size muffins, so don't worry if it looks a little scant - they rise well. They bake for 25 to 30 minutes, until the tops are golden brown. I really enjoyed mine warm with some nice lightly salted butter. They were also good reheated later in the microwave with, of course, some more butter. They lasted less than 24 hours, but I did take them to a dinner party and pawn off 7 or 8 there.


***

My Monday night dinner, as mentioned, was cornbread and vegetarian chili. Lindsay had made meat chili on Sunday night and I figured we would have leftovers of meat chili and I would make a vegetarian version for the vegetarian housemate (clever, aren't I?). For the cornbread, I followed the recipe pretty closely. I actually didn't love it as much as the classic and simple Jiffy cornbread, but they were good and were eaten within a day, so still met my standards for cooking.


Ingredients:

1 cup all-purpose flour
1 cup yellow cornmeal
6 tablespoons granulated sugar
2 1/2 teaspoons baking powder
1/4 teaspoon baking soda
1/2 teaspoon salt
Pinch of freshly grated nutmeg (optional)
1 cup buttermilk
3 tablespoons unsalted butter, melted and cooled
3 tablespoons corn oil (sunflower oil was what I had in my kitchen)
1 large egg
1 large egg yolk
1 cup corn kernels (I used canned, rinsed)


Preheat over to 400 degrees. Whisk together flour, cornmeal, sugar, baking powder, baking soda, salt, and nutmeg. Separately, mix the buttermilk (I just used full fat milk), melted butter, oil (I used sunflower oil because that is a Bulgarian product and readily available), egg and extra yolk. Pour liquid over dry ingredients and mix together quickly but gently. Stir in the rinsed corn kernels (SK says you can use fresh, but I didn't, so I don't know how that would affect the recipe), and your lumpy batter is ready to go. I greased up my muffin tin again and poured them in. Bake for 15 - 18 minutes until golden brown. I served them with chili, but also had out butter and honey because that is how my mom usually tops them, though we also regularly had cornbread with applesauce. Apparently, this isn't common practice, but I have always found it really delicious and comforting.


***

For the vegetarian chili, I used SK's recipe as a guideline, but definitely improvised with what was available and didn't really measure my spices and just sprinkled them on throughout the process. I went ahead and adjusted the ingredients to what I used, but go to her site if you are interested in her recipe, which has a few more ingredients and specific measurements.

Ingredients:

1 tablespoon vegetable oil
1 onion, diced
1 15-ounce can of white beans, drained and rinsed
1 15-ounce can of kidney beans, drained and rinsed
1 cup corn (canned, rinsed)
1 15-ounce can whole tomatoes
1 cup water with bouillon cube
2 tablespoons chili powder
1 1/2 teaspoons cumin
1 teaspoon ground coriander
1 tablespoon unsweetened cocoa


I sauteed the onions in the vegetable oil first, not until completely transparent and soft, but so that they developed some flavor and caramelization on their own first. Then I added in the garlic briefly, so as not to burn (done that a few times), and then poured in the water and bouillon cube to get it to dissolve first. Then I added the drained beans and tomatoes with their sauce, and jabbed the tomatoes a bit to break them up. Our bean selection here is limited, so I only had kidney and white beans, in her recipe she calls for black, pinto, and kidney, which I would have used given availability. My chili turned out well, though, and didn't feel lacking with just the two varieties. I measured out the cocoa and then just added chili powder, cumin, and coriander as I felt appropriate (mostly just continued shaking them in intermittently throughout cooking because I wanted to make sure it wasn't boring and had a kick because my roommate likes spicy food). I also added some of the corn left over from my cornbread muffins as well as some salt and ground pepper. I let it cook for about 30-45 minutes on medium heat, stirring occasionally. I thought it turned out really well and the great thing about chili is that it just gets better with time, so it is one of the few foods I enjoy having leftovers with because the flavors just continue to develop and intensify in the fridge or freezer.

I generally make my dad's non-vegetarian chili and I will have to cook that sometime and post it. He usually serves his chili with rice and I like that, but I sort of ditzed out and forgot to make it with this recipe, so we just had it topped with cheese (necessary) and served with cornbread muffins. I think everyone felt pretty satisfied with that.

I didn't take too many pictures of the chili (read: one) because it just doesn't photograph that well. Much more delicious than visually appearing, and one of my favorite fall/winter comfort foods.