Showing posts with label fresh. Show all posts

Thursday, February 20, 2014

Green beans

I often over order with groceries (because with one person, ordering 3 vegetables for a week can be too much to cook), so I'm often scrambling to cook them before they're bad. I think it is really good and important to remember that a lot of food tastes really good done simply. The other night, I cooked flounder in coconut oil, lemon juice, salt, and pepper, and it was great. I followed it with chips and guac and felt pretty thrilled about the whole thing. So while I completely endorse getting together a bunch of new and specific ingredients to try out a new recipe, I think we shouldn't feel so concerned about what to do if we don't have it all. Odds are in your favor that if you throw something in a pan with a fat (butter, olive oil, coconut oil depending on the flavor profile you're into) and sprinkle with salt and pepper, you'll end up with something edible and reasonably tasty. The corollary to that is to buy simple, fresh veggies and meat and fish so that they can stand alone well.

Tonight I heated up some fresh direct soup (meh, things like that remind me how much better homemade is) and then cooked some green beans to prevent them from spoiling over the weekend. I cooked them in the pan with butter and salt until they looked browned and a couple tasted still crisp but cooked (I'm fine with a range of textures usually). Then I served them with some goat cheese. It was great! And I mean that it met my standards for tasting good, being a positive contribution to my nutrition for the day, and helped reduce my produce drawer population boon. 


Tuesday, August 21, 2012

purple potatoes three ways

Well, to be totally frank, I made the potatoes sort of three ways and then turned one into one that I already had, so I really mostly ate them two ways: roasted and mashed. And they are so good that way. The third way, that semi-involved a recipe that I mostly didn't follow, was fork-mashed and with a zesty flavor profile as per this SK recipe. I didn't quite have everything on-hand to make it, so when it didn't seem stunning, I just made them creamy and mashed and delicious. While they look like a weird purple yogurt when mashed, they taste pretty yummy, so I don't mind. They were also delicious roasted. What vegetable isn't delicious roasted? I have yet to meet it. It's such a simple and elegant solution to any veggie "problem," and I never have any problem cleaning a plate full of roasted vegetables. They just hit some flavor spot that my mouth is a big fan of and my conscience feels great about.

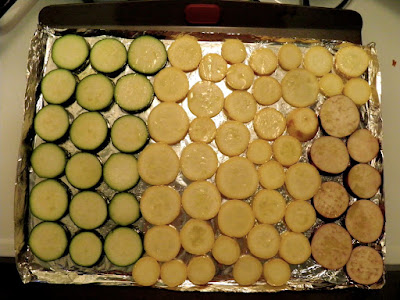
So... so much for a recipe. Here's some pics of roasted purple potatoes and squash (some with olive oil and spices, some with olive oil and cinnamon sugar). And some other veggies that got roasted and eaten straight off the foil in a dignified manner.


iphone hipstamatic or nice olympus picture?
I honestly can't decide which is better, which is frustrating...


Spicy Roasted Pepper Sauce

I saw this recent post on Smitten Kitchen about a roasted pepper sauce, and because I still had a plethora of veggies laying around (down to potatoes, a squash, and maybe a couple peppers or something), I thought I'd wing this recipe with what I had to use up all my peppers. I appreciate peppers, but I'm not a huge fan, so I wasn't really eager to just eat them raw or in anything else because that's just not what my taste buds liked. I haven't, in the course of the week, really found a use for it yet - but I think that is more because smoky, spicy, pepper flavor isn't my bag and not because this isn't totally delicious and worth having on your food.
 how cute beyond cute are those little guys?
also, I think they are the spiciest ones, so big things in small packages, etc.


Yield: 1 2/3 to 2 cups steak sauce.

1 red bell pepper, small was suggested [I had 3 tiny peppers, 2 small green bells, and 1 larger yellow bell pepper]
2/3 cup canned or fresh tomato purée
1/4 cup orange juice [I used lemonade because that's what I had]
2 tablespoons Worcestershire sauce
2 tablespoons olive oil
1 tablespoon balsamic vinegar
1 tablespoon molasses [I didn't have any so I used syrup]
3/4 teaspoon table salt or more to taste
1 teaspoon ground mustard [I just used some dijon]
1/2 teaspoon ground ginger [didn't have]
1/4 teaspoon freshly ground black pepper
1/4 teaspoon onion powder [didn't have]
1/8 teaspoon ground allspice [didn't have]

Preheat your broiler. Place your pepper on a baking sheet and cook it under the broiler until all sides are charred, turning with with tongs as needed. Don’t skimp on the charring as this skin will add a fantastic flavor dimension. Mine took about 15 minutes, but I have a terrible broiler [I think mine were in there for like 45 minutes, but I just had them in the oven at 400 with other veggies to roast]. Yours might only take 5 to 8 minutes. Transfer pepper to somewhere to cool until you’re able to handle it, about 15 minutes.

Tear open the pepper and remove the seeds and membranes with your fingers or a paring knife [mine were so soft this was crazy easy]. Add the pepper (with its skin) to the blender along with the remaining ingredients. Puree mixture until as smooth as possible. Transfer mixture to a small saucepan. Simmer it gently over low heat for 15 minutes, stirring from time to time. It will yield a fairly smooth that can be used as is, but if you’d like a smoother consistency, you have two options: running it back through the blender or food processor again (I got a smoother blender after the fibers had cooked down more on the stove)[this is what I did] or pressing it through that fine-mesh sieve (I started doing this, then decided it wasn’t worth the trouble).

Store in an airtight jar in the fridge for one week, though I suspect it will keep for two.

Friday, August 10, 2012

blueberry peach muffins

My mom bought some fruit while she was in town visiting me (yay for mommies), but sadly, I couldn't eat it all before it started getting too soft for my liking. So I baked it! Best solution to handling overripe fruit. This time I went with a Joy of Cooking basic muffin recipe and threw in the rest of my blueberries and two peaches (which I know are peaches thanks to some helpful identifying advice from a friend - peaches, nectarines, apricots, my brain can't keep them straight). They weren't the best muffins I've ever made - I used half and half (my mom bought it and I'll never use it otherwise), so maybe that was why? Or maybe because I used oil instead of butter, and I don't love oil? Or probably I overmixed it because it was smooth. I'm not sure but I just wasn't crazy about the texture. The fruit is yummy, though, of course, and my friends liked them enough to eat them, so problem solved.


2 cups all purpose flour
1 tbsp baking powder (make sure its not clumpy, I keep finding them in my finished products)
1/2 tsp salt
1/4 tsp grated or ground nutmeg (I also add some cinnamon and cardamom, why not?)
2 large eggs
1 cup milk or cream
2/3 cup sugar or brown sugar
1/4 to 1/2 cup (1/2 to 1 stick) butter, melted, or 1/4 to 1/2 cup oil
1 tsp vanilla

Preheat oven to 400 degrees.

Mix flour, baking powder, salt, and nutmeg together. In another bowl, whisk eggs, milk, sugar, butter/oil, and vanilla. Mix together with a few light strokes, just until the batter is moistened but not overmixed and smooth. Add in cut up fruit. Pour into muffin tin.

Bake for 17 minutes (longer with fruit) until toothpick comes out clean. Let cool for 2-3 minutes before removing from pan. Serve warm with some butter, and it's delicious!

I've found that when I keep baked goods, it is actually better to not seal them fully because they get soggy sometimes. But it depends on a lot of things. 

Thursday, August 2, 2012

squash, zucchini, and eggplant rice gratin

As you can see in the last entry, I have quite a few veggies on my hand. In an effort to cook with them and waste as little as possible (advice, please!), I wanted to make something that would use quite a few tonight for dinner. This recipe took me about 2 hours and involved me being pretty darn hot in my kitchen for a lot of it (when I'm cooking, I just keep my a/c off and the windows open and fan on; save the electricity costs and I'll be hot regardless). The biggest "failure" of the recipe was the rice - but that is because, try as I might (and I do, oh I do), I am so bad at cooking rice. Every time I read someone's foolproof recipe and try my darndest to follow it exactly, but it still burns. At best, it's a bit soggy and I'm just thrilled it doesn't taste like burned popcorn. Tonight was more of a burned night. So that brought the dish down a bit to have slightly crispy, burnt popcorn flavored rice. One day I will prevail!

I love love love roasted veggies, though, and I could probably have eaten them all right off the sheet after the oven (so good), so that part of the recipe went well. I didn't have enough cheese for it to be really cheesy, so I added in a bit of my whole organic yogurt instead of cheese to the egg mixture and then just grated some cheese on top. I also didn't have tomatoes (I sure as heck wasn't going to buy more veggies), and so while that certainly changed the recipe, I don't think it was really a negative effect. I wouldn't recommend using the cast iron skillet to cook it in, but I just was overrun with dirty dishes and didn't care. I am sure the recipe as she has it is delicious and one day I hope to make it. But this was good and different, and I enjoyed giving it a try in between crying over the Olympics (I'm just such a sucker for sports).


1/3 cup white rice, long-grain is suggested but use whatever you prefer
5 tablespoons olive oil
1 1/2 pounds zucchini (about 3 medium), sliced 1/4-inch thick
1/2 pound plum tomatoes, sliced 1/4-inch thick
Table salt and freshly ground black pepper
1 medium onion, halved lengthwise and thinly sliced
3 garlic cloves, minced
2 large eggs, lightly beaten
1 teaspoon chopped fresh thyme leaves
1/2 cup grated Parmesan, divided

Preheat oven to 450°F. Cook the rice according to your favorite method. The package directions work in some cases, but check my notes above about adjustments I find I have to make. If you cook the rice in a large, wide-ish covered skillet, it might cook even faster but you’ll have the chance to use it again (and save on dirty dishes) when you need to cook the onions in a bit.

While rice cooks, coat two large (or, if you have the same pitifully small oven as I do, three smaller) baking sheets each with a tablespoon of a of olive oil (a bit less for smaller pans). Spread zucchini and tomato slices on the baking sheets in as close to a single layer as you can. Sprinkle with 1/2 teaspoon salt and a few grinds of black pepper. Roast tomatoes for 10 minutes and zucchini for 20. Flip zucchini halfway through; it’s not worth the messy effort for the tomatoes. Leave oven on.

Heat large, heavy skillet (such as the one you used to cook your rice) over medium heat. Once hot, add 2 tablespoons olive oil, heat oil, then add onions, garlic and 1/4 teaspoon salt to pan. Cover and reduce heat to low, cooking onion until limp and tender, about 15 to 20 minutes. Stir occasionally.

Combine onion mixture, rice, eggs, thyme, half of your grated cheese and a half-tablespoon of olive oil in a bowl. Add a good amount of freshly ground black pepper. Use the remaining half-tablespoon of olive oil to coat a shallow 2-quart baking dish. Spread half of rice mixture in bottom of dish. Arrange half of roasted zucchini on top. Spread remaining rice mixture over it and please don’t worry about being neat about this; dinner will be “rustic” tonight! Arrange remaining zucchini on top, then tomato slices. Sprinkle with remaining grated cheese and bake until set and golden brown, about 20 minutes. Each oven varies, but I find mine does the very best browning when the dish is on a rack near the top of the oven.

Wednesday, February 15, 2012

valentines: chocolate covered strawberries

Enter recipe 1 from the Valentine's Day extravaganza!! Okay, it wasn't an extravaganza, but it was extra delicious and sweet and so much better than going out or doing anything else. My boyfriend made me dinner (we'll get to that in another post, but basically, mind=blown) and I made desserts. Item 1 was chocolate covered strawberries. Everyone was selling them (I didn't realize that was the v-day option, other than flowers and chocolates), so I thought, why don't I make some myself? Not only was it less expensive (not that that's why), but I love new cooking projects and this was super easy. Do you have dark chocolate and strawberries? Oh okay, you're pretty much there.

Okay, there isn't really a recipe. Basically, use semisweet chocolate (I used Baker's baking chocolate) and white chocolate (I thought I had some and didn't want to mess with the hordes at the grocery store, so we did without, but I would have liked some). I made about 10-12 strawberries with 4 or 5 oz of chocolate (I started with 3 oz added more later and now I can't remember how much).

Use a double boiler (say whaaat???) to heat the chocolate. In case you don't have one (like me), it's so easy to replicate that it's almost silly. Get a saucepan and put some water in it. Put a bowl in the saucepan that can get hot (like glass) that will sit above the water (so not sitting in it but resting on the sides). [See pictures below.] Turn the heat on the stove to high to get the water boiling. This creates a nice, warm, but not aggressive environment to heat up things like chocolate in.


Then you just dip your strawberries into the melted chocolate. After they are dipped, point them up to the ceiling a bit to get the chocolate to set before placing them on parchment paper. While they are still wet, you can sprinkle shredded coconut or grate nutmeg or pistachios (I did this because my boyfriend loves loves loves pistachios - you can't really taste it but the green looks pretty) or whatever floats your boat.


If you, unlike me, remember white chocolate, melt it in the same way as the dark, using a double boiler. Then you can do all sorts of fun stuff like drizzling the white chocolate over the dark or dipping strawberries half in one and half in the other (you should wait for one to dry first, but you knew that) or making cute designs or writing stuff (like I wanted to). Then put them in the fridge for at least 30 minutes to harden and voila!
What matters most is that they are delicious, pretty, and for some reason, very romantic and exciting (I'm not arguing but it doesn't make much since - they are so simple!). I decorated my valentine's table like this so that when my boyfriend got home from working out, I had a little romantic set-up for us. Luckily, he liked it and didn't think it was too cheesy (or was sweet enough not to say so). The pink roses are from him. <3

Don't forget to read about dinner! It was incredible!
[note: does anyone play that Zynga Scramble game? If so, you will know what I mean about that voice and how it says amazing! incredible! etc and that's now how my brain says it.]

Wednesday, January 18, 2012

juicing

After a few conversations about it with my boyfriend and a viewing of Fat, Sick, and Nearly Dead (on Netflix instant watch, check it out), we decided to try out a juice diet/fast. Our original plan was 3 days, but we went 46 hours before deciding we wanted dinner. On the one hand, it was challenging, but on the other hand, I felt pretty good and most of my hunger wasn't real hunger. More on that later. I'd definitely do it again.

In the documentary, he goes on a 60 day juice diet and encourages several people to try it out with a 10 day juice cleanse. We decided on 3 days because we weren't as unhealthy as most of the people in the film who were trying it out, and I wanted to make sure that I picked a really feasible amount of time so that my willpower would last. Not to throw him under the bus, but while I was definitely hungry and ready for food, my boyfriend was the one who was really ready to eat. I felt hunger, but once I had a glass of juice, I was pretty full and could last a few hours before the next dose. I think some of the impact on our slightly different responses can be a result of
  • gender (he needs more calories and we were drinking about the same amount)
  • activity level (we both workout, but since I don't have a job, I'm not as out and about as much)
  • muscle mass (going back to calorie needs)
  • mental need for food
Don't get me wrong, I love food. I think about it, I almost exclusively watch the Food Network, the highlight of my day is usually cooking or going out to eat for dinner, and I spend a good amount of time with recipes thinking about what to make next. Like many people, a lot of my best moments have involved food and friends together. That said, it wasn't so hard for me not to eat it because I knew that 3 days would end relatively quickly and then it would be back in my life. It wasn't a radical lifestyle change, just an experiment. I would like to stress that I am a pretty healthy person in general, so it could inspire a significant life change and shift in eating habits for a lot of people who really need it. 

3 days of fruit and vegetable leftovers from my juicer


In the movie, everyone who tried it talked about how much better they felt, they quickly lost some junk pounds, their skin really improved (part of what inspired me to try it), and their systems got nicely cleaned out within a couple days (yes, I'm talking about poop - and not just any poop, but getting rid of things that have been clinging to your insides for a while). They say that the first few days are pretty brutal physically and emotionally. I can't really speak to that because I mostly felt fine, and other than obviously being aware that I was only ingesting juice and water, nothing really felt or seemed or behaved differently in my body. 

Was it worth it? Definitely. I liked getting to try something new and challenge myself a bit. I definitely felt healthy knowing that I was only putting good things in my body. I did feel awake and energized throughout the day, and I think hoping that it would make me and my skin better had a good positive thinking impact on how it went. 

Some important things to remember if you try it out:
  • This isn't fasting - you can drink as much water as you want, and, as far as I understood it, as much juice as you want
  • Store bought juice is NOT equal to the juice you should make for this. We bought a gallon of juice from a local juice bar (sort of a brutal flavor) that was made fresh for me and then used a juicer to make the rest of it. If you do this, drinking glass after glass of OJ and apple juice is not the correct thing.
  • When we think of juice, we think fruits. This should be heavily vegetable based. Fruits are important for balancing the flavors and masking some of the vegetable taste (apples, citrus, and ginger are great for this), but they aren't the bulk of it. 
  • Read up on it. We based ours mostly off the movie, some recipes for the Mean Green juice used in the film, and some basic internet searches. 
My fridge with our first batch of groceries for the juice fast:
oranges, green apples, lemons, strawberries, cucumber,
blueberries, blackberries, carrots, spinach, kale, ginger
 the juice we bought: the love cleanse
cucumber, celery, parsley, coconut water, spinach, kale
*it tasted very intensely like these veggies; we always mixed it with 
apple, citrus, and other items to help with the flavor so we could drink it


An example of one of our homemade juice meals (for two):
  • 1/2 bunch kale
  • 1/2 bunch spinach
  • 2 oranges
  • 2 green apples
  • 1 lemon
  • 1 banana
  • 1-2 carrots
  • handful blueberries/other berries

Sunday, November 27, 2011

thanksgiving: cranberry relish

I liked this more than the normal cranberry relish we have at Thanksgiving. First of all, I am not a huge fan of the skin on the cranberries and the texture that it gives the relish, and I think that cooking this down a bit made it all softer and more palatable for me. Also, obviously, the sugar and cinnamon helped make it sweet and yummy. Even my mom and grandma liked this little departure from the norm.


1 package cranberries
1 medium orange, seeded and cut into small wedges
1 cinnamon stick/1 tsp cinnamon
1 cup sugar

Put the cranberries and orange pieces in a food processor (or your grandma's old hand crank food mill).

In a saucepan on the stove on low heat, cook the cranberry/orange mix with the sugar and cinnamon (I didn't have a stick, so I just put some cinnamon in) until it is warm throughout (about 5 minutes). Serve warm or cooled. 

Monday, October 3, 2011

lemon mint cake

I was watching the Food Network at the gym the other day and saw Giada making this cake. It looked pretty simple, and I'm a growing fan of souffles, so I decided to try it out. I got a bit frustrated because my mixer didn't really manage to beat the egg whites to the appropriate level of stiffness, but I think the cake turned out pretty well even though it wasn't perfect. The flavors were interesting, but it was really good with the simple syrup over it. Even the boys liked it, and they all sort of balked at the lemon mint combination.
 Exhibit A: my not so stiff egg whites. Sigh.


Cake:
3 eggs, separated, at room temperature
1 cup sugar, divided
1/4 cup vegetable oil
1/8 teaspoon salt
8 mint sprigs, leaves chopped
2 tablespoons lemon juice
1 tablespoon lemon zest
1 cup all-purpose flour

Syrup: [this will make much more than you need for the cake, but as Giada mentions on the show, you can use it for cocktails and other desserts]
1 cup sugar
1/4 cup water
1/4 cup lemon juice
1 tablespoon lemon zest

Fresh mint sprigs, for garnish


Preheat oven to 350 degrees F. Butter and flour an 8-inch round cake pan.

For the cake: In a large bowl, using an electric mixer, beat the egg whites to soft peaks. Add 1/2 cup sugar and beat until the mixture holds stiff peaks.

In a separate large bowl, beat the vegetable oil, the remaining 1/2 cup sugar and salt. Add the egg yolks 1 at a time. Add the chopped mint, lemon juice and lemon zest. Add the flour and mix until just combined. Set aside.

Slowly add 1/2 of the egg white mixture into the oil mixture. Using a rubber spatula, carefully fold in the remaining egg white mixture. Spread the batter into the prepared cake pan and bake for 40 to 45 minutes until a toothpick inserted into the middle of the cake comes out clean. Transfer the cake to a cutting board and allow to cool before slicing.

For the syrup: In a small saucepan, combine the sugar, water, lemon juice, and lemon zest over medium heat. Bring to a boil, reduce the heat, and simmer until the sugar has dissolved, about 5 minutes, stirring occasionally, Remove the pan from the heat and allow the syrup to cool, about 20 minutes.

To serve, spoon some of the syrup onto each small plate or shallow bowl and lay a slice of cake on top. Drizzle the cake with additional syrup and garnish with a small sprig of mint

Nutritional information (for 1/12 of cake with syrup)
177 calories
6g total fat
31g carbs
3g protein

Thursday, September 1, 2011

sauteed tilapia with salsa

I have been wanting to use my new hand blender and all its accessories, so the other day I made some homemade salsa. It wasn't terribly exciting, I just threw some tomato, onion, cilantro, line juice, and salt into the chopper and let it do the work. It made it pretty small, so its was more pureed than most salsa. I think if I wanted it chunkier, I would need to do less pieces at a time and mix it up separately. But it did taste pretty good, though pretty simple for those of you that like more jazzy flavors. You could add mango or jalepeno or whatever else tickles your fancy.

Tonight I invited my sister over for dinner, and as she is a pescatarian, I decided to get some tilapia. My dad makes it pretty often considering that both his girlfriend and my sister only eat fish, and it is really easy to cook tilapia, in addition to it being pretty inexpensive. I went to Central Market to get some on my way home today and it was $7.99/lb and for one filet it was only about $3. I also made some zucchini fritters (posted earlier) to go with the fish and then lemon glaze muffins for dessert.


I didn't really follow a recipe for this. I looked up how to cook tilapia, but it seemed pretty foolproof, so I just decided to give it a try. I put about a tablespoon of butter in a skillet and then put in the filet of tilapia, cut down the middle, and then poured about a half cup or so of salsa on top. Then I just let it cook a few minutes on each side until it was white and flaky. Once I served it onto our plates, I spooned some more of the fresh salsa on top. We both really liked it!

As far as nutritional information goes, our tilapia filet was about 0.4 lb which is about 6 ounces. According to this nutrition website, an ounce of raw tilapia is 27 calories, 0 g fat, and 6 g protein. So my serving size of about 3 ounces plus some butter and homemade salsa is:

Nutritional info (3 ounces fish cooked in salsa and butter) [estimated]
150 calories
7 g total fat
15 mg cholesterol
5 g carbs
16 g protein

Monday, May 30, 2011

vegetarian sushi

The other day, I bought a sushi kit from the HIT. It was about 20 leva, which is like $14. It seemed a bit expensive, but since I love sushi and have wanted to try it out, I decided it was worth it for the experience. Then it sat on my shelf because I didn't have the time to make it for any upcoming dinners and the HIT didn't have good avocados for a while. But tonight was the night. So, I opened up my sushi kit and more or less followed the directions. Lindsay may have pointed out that I was not doing a very good job rationing my rice out, as is evidenced by some of my jumbo sushi rolls. Whatever. I called it TEXAS Style Sushi - because everything's bigger in Texas.

 And the first, Texas Sized roll, with my hand for scale:


It was actually a very simple process, maybe because I was using a box. But still, it seemed well within my abilities except that the bagged rice helped me overcome my general inability to handle cooking rice.
  1. Cook rice
  2. Mix in sushi rice vinegar (whatever that might actually be)
  3. Let rice cool
  4. Lay seaweed out on bamboo mat
  5. Scoop out a *reasonable* mound of rice into center of seaweed
  6. With wet fingers, press rice out across seaweed, leaving a border
  7. Lay goodies in the middle - I used cucumber and avocado
  8. Roll away from you, pressing roll together as you go
  9. Voila! Sushi
So I made one giant roll, one normal roll, and another giant role. Portion control difficulties with the rice. But all's well that ends well, and we all found it pretty yummy and satisfactory. If I could easily get my hands on some more sushi rice and seaweed wraps, I would definitely do it again. Very fun and yummy and pretty easy.